Table of Contents
In this tutorial, you will learn:
-
How to display a local notification when the app is both in background and foreground.
- How to send push notifications in React Native using Expo.
- How to send push notifications from one phone to another.
- To build a back-end to send push notifications to your users.
Local Notifications
You might have come across apps which will display notification locally, such as a reminder app. These notifications are called local notifications since they are sent from within the app.
First, let's learn how to display a local notification in our app and later we will make use of these local notifications to display push notifications.
Creating the Project
Create a new Expo project using the following command. While creating the project, it would ask you to select a template. Choose "blank" template.
1expo init react-native-push-notifications
In order to show notifications, we need to install the package expo-notifications.
Also, in iOS we need explicit permission from the user to display notifications.
The package expo-permissions is used to handle permissions. So let's install both of them by running the following command:
1expo install expo-notifications expo-permissions
Now open app.json and add "useNextNotificationsApi": true for enabling notifications in Android:
1{2 "expo": {3 "name": "react-native-push-notifications",4 "slug": "react-native-push-notifications",5 "version": "1.0.0",6 "orientation": "portrait",7 "icon": "./assets/icon.png",8 "splash": {9 "image": "./assets/splash.png",10 "resizeMode": "contain",11 "backgroundColor": "#ffffff"12 },13 "updates": {14 "fallbackToCacheTimeout": 015 },16 "assetBundlePatterns": ["**/*"],17 "ios": {18 "supportsTablet": true19 },20 "android": {21 "adaptiveIcon": {22 "foregroundImage": "./assets/adaptive-icon.png",23 "backgroundColor": "#FFFFFF"24 },25 "useNextNotificationsApi": true26 },27 "web": {28 "favicon": "./assets/favicon.png"29 }30 }31}
Update the App.js with the following code:
1import React, { useEffect } from "react"2import { StyleSheet, View, Button } from "react-native"3import * as Notifications from "expo-notifications"4import * as Permissions from "expo-permissions"56// Show notifications when the app is in the foreground7Notifications.setNotificationHandler({8 handleNotification: async () => {9 return {10 shouldShowAlert: true,11 }12 },13})1415export default function App() {16 useEffect(() => {17 // Permission for iOS18 Permissions.getAsync(Permissions.NOTIFICATIONS)19 .then(statusObj => {20 // Check if we already have permission21 if (statusObj.status !== "granted") {22 // If permission is not there, ask for the same23 return Permissions.askAsync(Permissions.NOTIFICATIONS)24 }25 return statusObj26 })27 .then(statusObj => {28 // If permission is still not given throw error29 if (statusObj.status !== "granted") {30 throw new Error("Permission not granted")31 }32 })33 .catch(err => {34 return null35 })36 }, [])3738 const triggerLocalNotificationHandler = () => {39 Notifications.scheduleNotificationAsync({40 content: {41 title: "Local Notification",42 body: "Hello this is a local notification!",43 },44 trigger: { seconds: 5 },45 })46 }4748 return (49 <View style={styles.container}>50 <Button51 title="Trigger Local Notification"52 onPress={triggerLocalNotificationHandler}53 />54 </View>55 )56}5758const styles = StyleSheet.create({59 container: {60 flex: 1,61 backgroundColor: "#fff",62 alignItems: "center",63 justifyContent: "center",64 },65})
Displaying Notifications when the App is in the Foreground
By default, notifications will be displayed only when the app is running in the background.
But there will be scenarios where you would want to show the notification when the app is running in the foreground,
like informing the user about the completion of a task or reminding them to do something.
To enable the notifications when the app is in the foreground,
we call setNotificationHandler function with a handleNotification callback and pass shouldShowAlert as true
Requesting Permission in iOS
In iOS, you need explicit permission from the user to show the notification.
For that, we call Permissions.getAsync(Permissions.NOTIFICATIONS) to check if we already have the permission.
If we do not have the permission, then we call Permissions.askAsync(Permissions.NOTIFICATIONS) to get permission from the user.
If the user does not provide the permission, then we throw an error.
However, we are not handling the error in the catch block in our code.
You may show an alert to the user telling them they need to provide the permission.
Scheduling the Notification
When the button is pressed, we call Notifications.scheduleNotificationAsync inside triggerLocalNotificationHandler function.
It takes an object as an argument with properties content and trigger.
-
content- We can pass the notificationtitleandbodyinside the content. You can check out the other properties here. trigger- Tells when to show the notification. You can specify an absolute time or a relative time. In our case, we are specifying a relative time of 5 seconds from now. If you want the notification to be shown immediately, you can pass thetriggerasnull.
To repeat the notification, you can use the repeat property as shown below:
1Notifications.scheduleNotificationAsync({2 content: {3 title: 'Remember to drink water!,4 },5 trigger: {6 seconds: 60 * 20,7 repeats: true8 },9});
You can read about other ways of using the trigger input here.
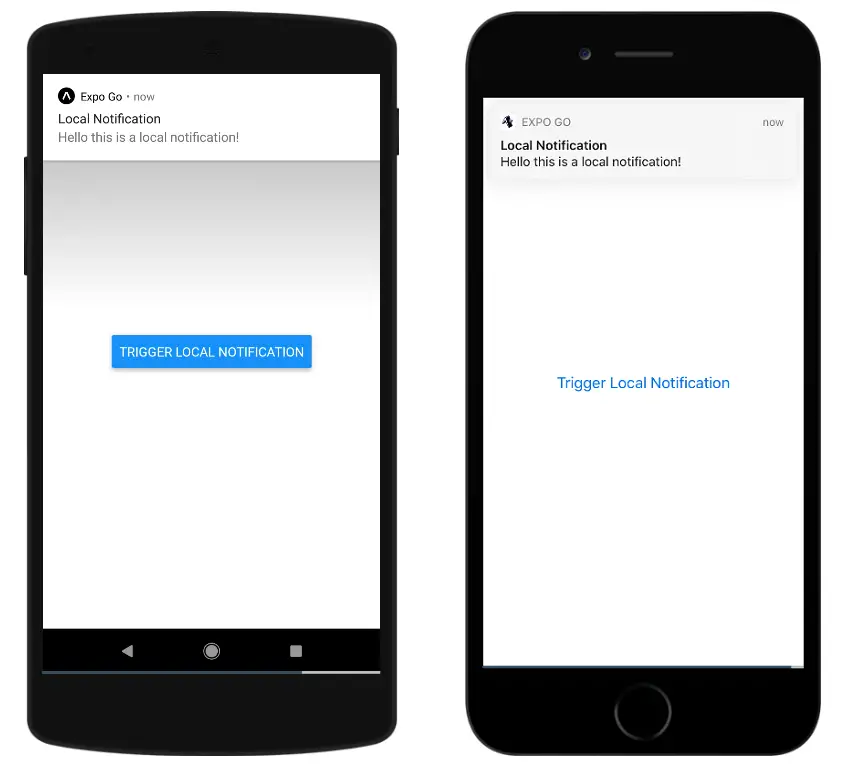
Now if you run the app in iOS, you will be asked for permission:

If you press the button, should be able to see the notification after 5 seconds:
Handling Received Notifications
You can subscribe to the received notification by passing a callback to Notifications.addNotificationReceivedListener and
add a function to be called when the notification is clicked by passing it to Notifications.addNotificationResponseReceivedListener as shown below:
1import React, { useEffect } from "react"2import { StyleSheet, View, Button } from "react-native"3import * as Notifications from "expo-notifications"4import * as Permissions from "expo-permissions"56// Show notifications when the app is in the foreground7Notifications.setNotificationHandler({8 handleNotification: async () => {9 return {10 shouldShowAlert: true,11 }12 },13})1415export default function App() {16 useEffect(() => {17 // Permission for iOS18 Permissions.getAsync(Permissions.NOTIFICATIONS)19 .then(statusObj => {20 // Check if we already have permission21 if (statusObj.status !== "granted") {22 // If permission is not there, ask for the same23 return Permissions.askAsync(Permissions.NOTIFICATIONS)24 }25 return statusObj26 })27 .then(statusObj => {28 // If permission is still not given throw error29 if (statusObj.status !== "granted") {30 throw new Error("Permission not granted")31 }32 })33 .catch(err => {34 return null35 })36 }, [])3738 useEffect(() => {39 const receivedSubscription = Notifications.addNotificationReceivedListener(40 notification => {41 console.log("Notification Received!")42 console.log(notification)43 }44 )4546 const responseSubscription =47 Notifications.addNotificationResponseReceivedListener(response => {48 console.log("Notification Clicked!")49 console.log(response)50 })51 return () => {52 receivedSubscription.remove()53 responseSubscription.remove()54 }55 }, [])5657 const triggerLocalNotificationHandler = () => {58 Notifications.scheduleNotificationAsync({59 content: {60 title: "Local Notification",61 body: "Hello this is a local notification!",62 },63 trigger: { seconds: 5 },64 })65 }6667 return (68 <View style={styles.container}>69 <Button70 title="Trigger Local Notification"71 onPress={triggerLocalNotificationHandler}72 />73 </View>74 )75}7677const styles = StyleSheet.create({78 container: {79 flex: 1,80 backgroundColor: "#fff",81 alignItems: "center",82 justifyContent: "center",83 },84})
Push Notification
To send push notification to a device through Expo, we need to know the push token of that device.
We can fetch the push token by calling Notifications.getExpoPushTokenAsync function:
1import React, { useEffect } from "react"2import { StyleSheet, View, Button } from "react-native"3import * as Notifications from "expo-notifications"4import * as Permissions from "expo-permissions"56// Show notifications when the app is in the foreground7Notifications.setNotificationHandler({8 handleNotification: async () => {9 return {10 shouldShowAlert: true,11 }12 },13})1415export default function App() {16 useEffect(() => {17 // Permission for iOS18 Permissions.getAsync(Permissions.NOTIFICATIONS)19 .then(statusObj => {20 // Check if we already have permission21 if (statusObj.status !== "granted") {22 // If permission is not there, ask for the same23 return Permissions.askAsync(Permissions.NOTIFICATIONS)24 }25 return statusObj26 })27 .then(statusObj => {28 // If permission is still not given throw error29 if (statusObj.status !== "granted") {30 throw new Error("Permission not granted")31 }32 })33 .then(() => {34 return Notifications.getExpoPushTokenAsync()35 })36 .then(response => {37 const deviceToken = response.data38 console.log({ deviceToken })39 })40 .catch(err => {41 return null42 })43 }, [])4445 useEffect(() => {46 const receivedSubscription = Notifications.addNotificationReceivedListener(47 notification => {48 console.log("Notification Received!")49 console.log(notification)50 }51 )5253 const responseSubscription =54 Notifications.addNotificationResponseReceivedListener(response => {55 console.log("Notification Clicked!")56 console.log(response)57 })58 return () => {59 receivedSubscription.remove()60 responseSubscription.remove()61 }62 }, [])6364 const triggerLocalNotificationHandler = () => {65 Notifications.scheduleNotificationAsync({66 content: {67 title: "Local Notification",68 body: "Hello this is a local notification!",69 },70 trigger: { seconds: 5 },71 })72 }7374 return (75 <View style={styles.container}>76 <Button77 title="Trigger Local Notification"78 onPress={triggerLocalNotificationHandler}79 />80 </View>81 )82}8384const styles = StyleSheet.create({85 container: {86 flex: 1,87 backgroundColor: "#fff",88 alignItems: "center",89 justifyContent: "center",90 },91})
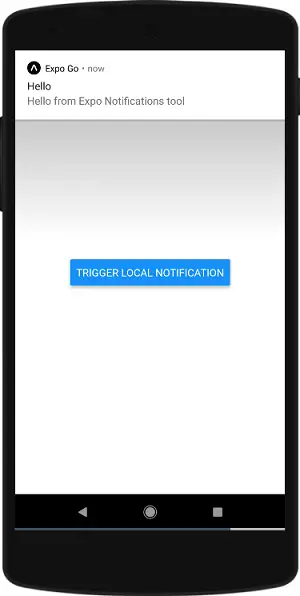
If you run the application now in the emulator, you will be able to see the token printed in the terminal.
Now you can send push notifications to the emulator using the expo notifications tool, just by providing the title, message and Expo push token.
Push notifications are not supported in the iOS emulator. It needs to be tested in a real device.
Sending notification from one device to another
If you have to send notification from one device to another you can do so by posting it to the expo endpoint as shown in the code below:
1import React, { useEffect, useState } from "react"2import { Button, StyleSheet, View, TextInput } from "react-native"3import * as Notifications from "expo-notifications"4import * as Permissions from "expo-permissions"56// Show notifications when the app is in the foreground7Notifications.setNotificationHandler({8 handleNotification: async () => {9 return {10 shouldShowAlert: true,11 }12 },13})1415export default function App() {16 const [title, setTitle] = useState()17 const [body, setBody] = useState()18 const [token, setToken] = useState()1920 useEffect(() => {21 // Permission for iOS22 Permissions.getAsync(Permissions.NOTIFICATIONS)23 .then(statusObj => {24 // Check if we already have permission25 if (statusObj.status !== "granted") {26 // If permission is not there, ask for the same27 return Permissions.askAsync(Permissions.NOTIFICATIONS)28 }29 return statusObj30 })31 .then(statusObj => {32 // If permission is still not given throw error33 if (statusObj.status !== "granted") {34 throw new Error("Permission not granted")35 }36 })37 .then(() => {38 return Notifications.getExpoPushTokenAsync()39 })40 .then(response => {41 const deviceToken = response.data42 console.log({ deviceToken })43 })44 .catch(err => {45 return null46 })47 }, [])4849 useEffect(() => {50 const receivedSubscription = Notifications.addNotificationReceivedListener(51 notification => {52 console.log("Notification Received!")53 console.log(notification)54 }55 )5657 const responseSubscription =58 Notifications.addNotificationResponseReceivedListener(response => {59 console.log("Notification Clicked!")60 console.log(response)61 })62 return () => {63 receivedSubscription.remove()64 responseSubscription.remove()65 }66 }, [])6768 const triggerLocalNotificationHandler = () => {69 Notifications.scheduleNotificationAsync({70 content: {71 title: "Local Notification",72 body: "Hello this is a local notification!",73 },74 trigger: { seconds: 5 },75 })76 }7778 const triggerPushNotificationHandler = () => {79 fetch("https://exp.host/--/api/v2/push/send", {80 method: "POST",81 headers: {82 Accept: "application/json",83 "Accept-Encoding": "gzip,deflate",84 "Content-Type": "application/json",85 },86 body: JSON.stringify({87 to: token,88 title,89 body,90 }),91 })92 }9394 return (95 <View style={styles.container}>96 <Button97 title="Trigger Local Notification"98 onPress={triggerLocalNotificationHandler}99 />100 <TextInput101 style={styles.textInput}102 value={title}103 placeholder="Title"104 onChangeText={setTitle}105 />106 <TextInput107 style={styles.textInput}108 value={body}109 placeholder="Body"110 onChangeText={setBody}111 />112 <TextInput113 style={styles.textInput}114 value={token}115 placeholder="Token"116 onChangeText={setToken}117 />118 <Button119 title="Trigger Push Notification"120 onPress={triggerPushNotificationHandler}121 />122 </View>123 )124}125126const styles = StyleSheet.create({127 container: {128 flex: 1,129 backgroundColor: "#fff",130 alignItems: "center",131 justifyContent: "center",132 },133 textInput: {134 borderBottomWidth: 1,135 padding: 5,136 margin: 15,137 width: "80%",138 },139})
Here we have added 3 input boxes for entering notification title, notification body, and device token and bound them with local states. When the button is pressed, the expo API is called with these details.
Building a custom notification tool
Since we require the device token of the user to send notifications, we need to store them somewhere so that we can use them in the future. So, let's build a back-end, to where we can post the user token to save it to the database and a UI to retrieve the tokens and send the notifications.
Notification API back-end
Create a Node.js project using the following command:
1npm init react-native-push-api
Update the package.json as shown below:
1{2 "name": "react-native-push-api",3 "version": "1.0.0",4 "description": "",5 "main": "index.js",6 "scripts": {7 "test": "echo \"Error: no test specified\" && exit 1",8 "start": "node index.js"9 },10 "keywords": [],11 "author": "",12 "license": "ISC",13 "dependencies": {14 "body-parser": "^1.19.0",15 "cors": "^2.8.5",16 "dotenv": "^8.2.0",17 "expo-server-sdk": "^3.6.0",18 "express": "^4.17.1",19 "mongoose": "^5.12.3"20 }21}
Run npm install to install the dependencies mentioned above.
If you see, we are using expo-server-sdk to help in sending the notification to the expo server.
We are using MongoDB for storing the tokens. You may use either a local instance or connect to a cloud provider like MongoDB Atlas.
Now let's create a .env file and store the configurations there
1MONGO_DB_CONNECTION_STRING = mongodb://127.0.0.1:27017/react_native_push2WHITELISTED_DOMAINS = http://localhost:3000
WHITELISTED_DOMAINS will be used for CORS whitelisting of the client.
Now create a folder named utils and create a file called connectdb.js which helps in connect to the database:
1const mongoose = require("mongoose")2const url = process.env.MONGO_DB_CONNECTION_STRING3const connect = mongoose.connect(url, {4 useNewUrlParser: true,5 useUnifiedTopology: true,6 useCreateIndex: true,7})8connect9 .then(db => {10 console.log("connected to db")11 })12 .catch(err => {13 console.log(err)14 })
Create another file named expo.js with the following code.
The code is taken as-is from the expo-server-sdk GitHub page.
1const { Expo } = require("expo-server-sdk")2module.exports = (pushTokens, title, body, data) => {3 // Create a new Expo SDK client4 // optionally providing an access token if you have enabled push security5 let expo = new Expo({ accessToken: process.env.EXPO_ACCESS_TOKEN })67 // Create the messages that you want to send to clients8 let messages = []9 for (let pushToken of pushTokens) {10 // Each push token looks like ExponentPushToken[xxxxxxxxxxxxxxxxxxxxxx]1112 // Check that all your push tokens appear to be valid Expo push tokens13 if (!Expo.isExpoPushToken(pushToken)) {14 console.error(`Push token ${pushToken} is not a valid Expo push token`)15 continue16 }1718 // Construct a message (see https://docs.expo.io/push-notifications/sending-notifications/)19 messages.push({20 to: pushToken,21 sound: "default",22 title,23 body,24 data,25 })26 }2728 // The Expo push notification service accepts batches of notifications so29 // that you don't need to send 1000 requests to send 1000 notifications. We30 // recommend you batch your notifications to reduce the number of requests31 // and to compress them (notifications with similar content will get32 // compressed).33 let chunks = expo.chunkPushNotifications(messages)34 let tickets = []35 ;(async () => {36 // Send the chunks to the Expo push notification service. There are37 // different strategies you could use. A simple one is to send one chunk at a38 // time, which nicely spreads the load out over time:39 for (let chunk of chunks) {40 try {41 let ticketChunk = await expo.sendPushNotificationsAsync(chunk)42 console.log(ticketChunk)43 tickets.push(...ticketChunk)44 // NOTE: If a ticket contains an error code in ticket.details.error, you45 // must handle it appropriately. The error codes are listed in the Expo46 // documentation:47 // https://docs.expo.io/push-notifications/sending-notifications/#individual-errors48 } catch (error) {49 console.error(error)50 }51 }52 })()5354 // Later, after the Expo push notification service has delivered the55 // notifications to Apple or Google (usually quickly, but allow the the service56 // up to 30 minutes when under load), a "receipt" for each notification is57 // created. The receipts will be available for at least a day; stale receipts58 // are deleted.59 //60 // The ID of each receipt is sent back in the response "ticket" for each61 // notification. In summary, sending a notification produces a ticket, which62 // contains a receipt ID you later use to get the receipt.63 //64 // The receipts may contain error codes to which you must respond. In65 // particular, Apple or Google may block apps that continue to send66 // notifications to devices that have blocked notifications or have uninstalled67 // your app. Expo does not control this policy and sends back the feedback from68 // Apple and Google so you can handle it appropriately.69 let receiptIds = []70 for (let ticket of tickets) {71 // NOTE: Not all tickets have IDs; for example, tickets for notifications72 // that could not be enqueued will have error information and no receipt ID.73 if (ticket.id) {74 receiptIds.push(ticket.id)75 }76 }7778 let receiptIdChunks = expo.chunkPushNotificationReceiptIds(receiptIds)79 ;(async () => {80 // Like sending notifications, there are different strategies you could use81 // to retrieve batches of receipts from the Expo service.82 for (let chunk of receiptIdChunks) {83 try {84 let receipts = await expo.getPushNotificationReceiptsAsync(chunk)85 console.log(receipts)8687 // The receipts specify whether Apple or Google successfully received the88 // notification and information about an error, if one occurred.89 for (let receiptId in receipts) {90 let { status, message, details } = receipts[receiptId]91 if (status === "ok") {92 continue93 } else if (status === "error") {94 console.error(95 `There was an error sending a notification: ${message}`96 )97 if (details && details.error) {98 // The error codes are listed in the Expo documentation:99 // https://docs.expo.io/push-notifications/sending-notifications/#individual-errors100 // You must handle the errors appropriately.101 console.error(`The error code is ${details.error}`)102 }103 }104 }105 } catch (error) {106 console.error(error)107 }108 }109 })()110}
Now create a folder named models and create a file called token.js inside it:
1const mongoose = require("mongoose")2const Schema = mongoose.Schema3const Token = new Schema({4 tokenValue: {5 type: String,6 default: "",7 },8})910module.exports = mongoose.model("Token", Token)
Here we are creating Token model to store the token value in the database.
Finally, create the index.js file and update it with the following code:
1const express = require("express")2const cors = require("cors")3const bodyParser = require("body-parser")4const sendPushNotification = require("./utils/expo")56if (process.env.NODE_ENV !== "production") {7 // Load environment variables from .env file in non prod environments8 require("dotenv").config()9}1011require("./utils/connectdb")1213const Token = require("./models/token")1415const app = express()16app.use(bodyParser.json())1718// Add the client URL to the CORS policy19const whitelist = process.env.WHITELISTED_DOMAINS20 ? process.env.WHITELISTED_DOMAINS.split(",")21 : []22const corsOptions = {23 origin: function (origin, callback) {24 if (!origin || whitelist.indexOf(origin) !== -1) {25 callback(null, true)26 } else {27 callback(new Error("Not allowed by CORS"))28 }29 },30 credentials: true,31}3233app.use(cors(corsOptions))3435app.get("/", function (req, res) {36 res.send({ status: "success" })37})3839app.post("/send_notification", function (req, res) {40 const { title, body, data, to } = req.body41 if (to === "all") {42 Token.find({}, (err, allTokens) => {43 if (err) {44 res.statusCode = 50045 res.send(err)46 }4748 const tokens = allTokens.map(token => {49 return token.tokenValue50 })5152 sendPushNotification(tokens, title, body, data)53 res.send({ status: "success" })54 })55 } else {56 sendPushNotification([to], title, body, data)57 res.send({ status: "success" })58 }59})60app.post("/save_token", function (req, res) {61 const token = req.body.token6263 if (token) {64 Token.find({ tokenValue: token }, (err, existingToken) => {65 if (err) {66 res.statusCode = 50067 res.send(err)68 }69 if (!err && existingToken.length === 0) {70 const newToken = new Token({ tokenValue: req.body.token })7172 newToken.save(function (err, savedToken) {73 if (err) {74 res.statusCode = 50075 res.send(err)76 }7778 res.send({ status: "success" })79 })80 } else {81 res.send({ status: "success" })82 }83 })84 } else {85 res.statusCode = 40086 res.send({ message: "token not passed!" })87 }88})8990app.get("/all_tokens", function (req, res) {91 Token.find({}, (err, allTokens) => {92 if (err) {93 res.statusCode = 50094 res.send(err)95 }96 res.send(97 allTokens.map(token => {98 // remove unnecessary fields99 return { value: token.tokenValue }100 })101 )102 })103})104105// Start the server in port 8081106const server = app.listen(process.env.PORT || 8081, function () {107 const port = server.address().port108 console.log("App started at port:", port)109})
Here we are having 3 routes:
-
To send a notification to all the devices or a single device
- To save the device token to the database
- To fetch all the tokens from the database.
You may test it using postman. I have deployed it to Heroku and will be using that endpoint when we build the UI.
Building the notification console UI
Let's now go ahead and create a React Project to have a UI to send notifications using the API we have built.
Run the following command to create a new React project:
1npx create-react-app push-api-client
Install BlueprintJS to style the page:
1yarn add @blueprintjs/core
Now import BlueprintJS css in index.css
1@import "~normalize.css";2@import "~@blueprintjs/core/lib/css/blueprint.css";3@import "~@blueprintjs/icons/lib/css/blueprint-icons.css";45body {6 margin: 0 auto;7 max-width: 400px;8}
Now update the App.js with the following code:
1import {2 Card,3 Button,4 FormGroup,5 InputGroup,6 H2,7 TextArea,8 Intent,9 HTMLSelect,10 Toaster,11 Position,12} from "@blueprintjs/core"13import React, { useEffect, useRef, useState } from "react"14const allOption = [{ value: "all", label: "All" }]1516// Replace it with your own endpoint17const API_ENDPOINT = "https://react-native-push-api.herokuapp.com/"1819function App() {20 const [title, setTitle] = useState("")21 const [body, setBody] = useState("")22 const [data, setData] = useState()23 const [recipients, setRecipients] = useState(allOption)24 const [to, setTo] = useState("all")25 const [isSubmitting, setIsSubmitting] = useState(false)26 const toastRef = useRef()2728 useEffect(() => {29 fetch(API_ENDPOINT + "all_tokens").then(async response => {30 if (response.ok) {31 const tokens = await response.json()32 setRecipients(allOption.concat(tokens))33 }34 })35 }, [])3637 const formSubmitHandler = e => {38 let parsedData = {}39 try {40 parsedData = data ? JSON.parse(data) : {}41 } catch (err) {42 console.log(err)43 }4445 e.preventDefault()4647 setIsSubmitting(true)48 fetch(API_ENDPOINT + "send_notification", {49 method: "POST",50 headers: { "Content-Type": "application/json" },51 body: JSON.stringify({52 to,53 title,54 body,55 data: parsedData,56 }),57 })58 .then(async response => {59 setIsSubmitting(false)6061 if (response.ok) {62 toastRef.current.show({63 icon: "tick",64 intent: Intent.SUCCESS,65 message: "Notification sent successfully.",66 })67 } else {68 toastRef.current.show({69 icon: "warning-sign",70 intent: Intent.DANGER,71 message: "Something went wrong.",72 })73 }74 })75 .catch(err => {76 setIsSubmitting(false)77 toastRef.current.show({78 icon: "warning-sign",79 intent: Intent.DANGER,80 message: "Something went wrong.",81 })82 })83 }84 return (85 <Card elevation="1">86 <Toaster87 ref={toastRef}88 autoFocus={false}89 canEscapeKeyClear={true}90 position={Position.TOP}91 usePortal={true}92 />93 <H2>Send Push Notification</H2>94 <form className="notification-form" onSubmit={formSubmitHandler}>95 <FormGroup label="Notification Title" labelFor="title">96 <InputGroup97 id="title"98 placeholder="Notification Title"99 type="text"100 value={title}101 onChange={e => setTitle(e.target.value)}102 />103 </FormGroup>104 <FormGroup label="Notification Body" labelFor="body">105 <InputGroup106 id="body"107 placeholder="Notification Body"108 type="text"109 value={body}110 onChange={e => setBody(e.target.value)}111 />112 </FormGroup>113 <FormGroup label="Additional Data" labelFor="data">114 <TextArea115 growVertically={true}116 large={true}117 placeholder="Additional data in JSON"118 id="data"119 value={data}120 onChange={e => setData(e.target.value)}121 className="bp3-fill"122 />123 </FormGroup>124 <FormGroup label="Send To" labelFor="data">125 <HTMLSelect126 fill127 options={recipients}128 value={to}129 onChange={e => setTo(e.target.value)}130 />131 </FormGroup>132 <Button133 intent="primary"134 fill135 type="submit"136 text={isSubmitting ? "Sending" : "Send"}137 />138 </form>139 </Card>140 )141}142export default App
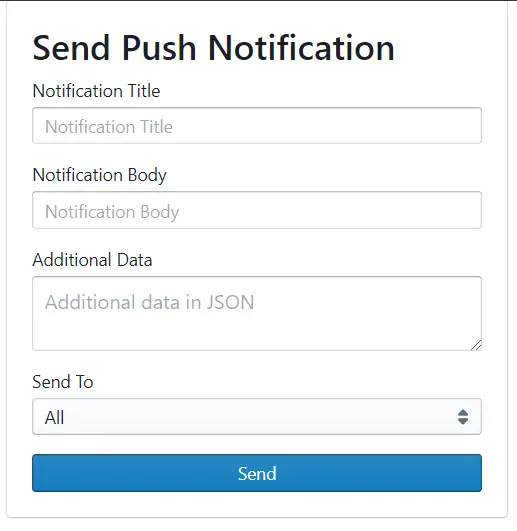
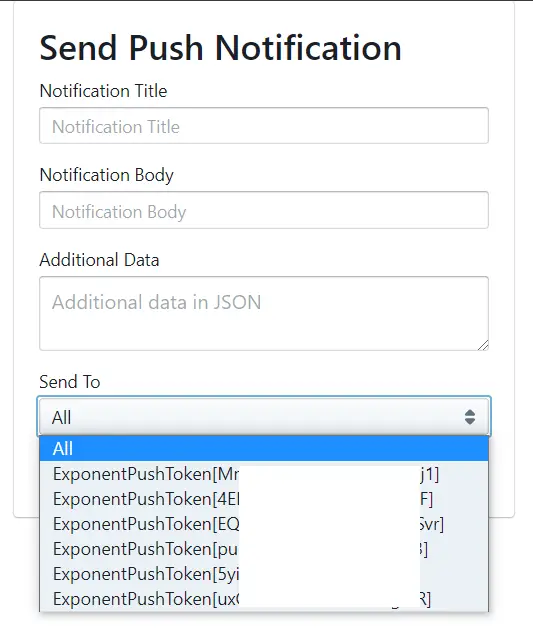
Now if you run the application, you should see a page as shown below:
Before testing the console, let's add code to send the device token from the App to the backend API.
In the Expo project, update the App.js as shown below:
1import React, { useEffect, useState } from "react"2import { Button, StyleSheet, View, TextInput } from "react-native"3import * as Notifications from "expo-notifications"4import * as Permissions from "expo-permissions"56// Show notifications when the app is in the foreground7Notifications.setNotificationHandler({8 handleNotification: async () => {9 return {10 shouldShowAlert: true,11 }12 },13})1415export default function App() {16 const [title, setTitle] = useState()17 const [body, setBody] = useState()18 const [token, setToken] = useState()1920 useEffect(() => {21 // Permission for iOS22 Permissions.getAsync(Permissions.NOTIFICATIONS)23 .then(statusObj => {24 // Check if we already have permission25 if (statusObj.status !== "granted") {26 // If permission is not there, ask for the same27 return Permissions.askAsync(Permissions.NOTIFICATIONS)28 }29 return statusObj30 })31 .then(statusObj => {32 // If permission is still not given throw error33 if (statusObj.status !== "granted") {34 throw new Error("Permission not granted")35 }36 })37 .then(() => {38 return Notifications.getExpoPushTokenAsync()39 })40 .then(response => {41 const deviceToken = response.data42 fetch("https://react-native-push-api.herokuapp.com/save_token", {43 method: "POST",44 headers: {45 Accept: "application/json",46 "Content-Type": "application/json",47 },48 body: JSON.stringify({49 token: deviceToken,50 }),51 })52 .then(() => {53 console.log("Token saved!")54 })55 .catch(err => {56 console.log(err)57 })58 })59 .catch(err => {60 return null61 })62 }, [])6364 useEffect(() => {65 const receivedSubscription = Notifications.addNotificationReceivedListener(66 notification => {67 console.log("Notification Received!")68 console.log(notification)69 }70 )7172 const responseSubscription =73 Notifications.addNotificationResponseReceivedListener(response => {74 console.log("Notification Clicked!")75 console.log(response)76 })77 return () => {78 receivedSubscription.remove()79 responseSubscription.remove()80 }81 }, [])8283 const triggerLocalNotificationHandler = () => {84 Notifications.scheduleNotificationAsync({85 content: {86 title: "Local Notification",87 body: "Hello this is a local notification!",88 },89 trigger: { seconds: 5 },90 })91 }9293 const triggerPushNotificationHandler = () => {94 fetch("https://exp.host/--/api/v2/push/send", {95 method: "POST",96 headers: {97 Accept: "application/json",98 "Accept-Encoding": "gzip,deflate",99 "Content-Type": "application/json",100 },101 body: JSON.stringify({102 to: token,103 title,104 body,105 }),106 })107 }108109 return (110 <View style={styles.container}>111 <Button112 title="Trigger Local Notification"113 onPress={triggerLocalNotificationHandler}114 />115 <TextInput116 style={styles.textInput}117 value={title}118 placeholder="Title"119 onChangeText={setTitle}120 />121 <TextInput122 style={styles.textInput}123 value={body}124 placeholder="Body"125 onChangeText={setBody}126 />127 <TextInput128 style={styles.textInput}129 value={token}130 placeholder="Token"131 onChangeText={setToken}132 />133 <Button134 title="Trigger Push Notification"135 onPress={triggerPushNotificationHandler}136 />137 </View>138 )139}140141const styles = StyleSheet.create({142 container: {143 flex: 1,144 backgroundColor: "#fff",145 alignItems: "center",146 justifyContent: "center",147 },148 textInput: {149 borderBottomWidth: 1,150 padding: 5,151 margin: 15,152 width: "80%",153 },154})
Now if you run the App on few devices, you will see the tokens being saved to the database and displayed in the dropdown:
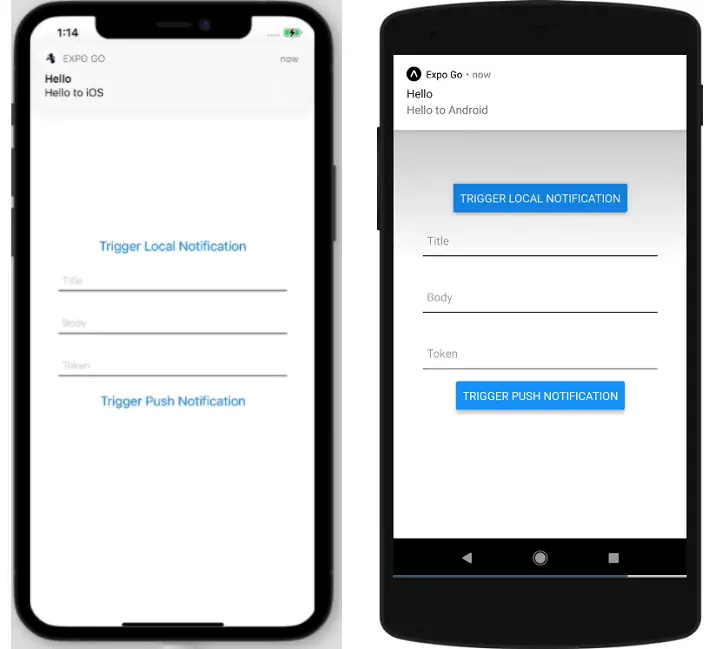
Now if you test the console and send the notification, you will see the devices getting the notification:
We are not having any authentication in place for the API endpoint. When you implement it in production, you should have authentication of some kind so that the endpoint is not spammed or misused.
You could use additional security by enabling Access Tokens so that even if the device token is stolen, it wouldn't be possible to send notifications without the access token.
Demo and Source code
You can see a demo of the Console here, the source code of the UI here, and the back-end API here.
App demo
If you have liked article, do follow me on twitter to get more real time updates!