
Table of Contents
Most of the applications you develop will require authentication of some kind. You can achieve this through social login, third-party authentication like Auth0 or by having an authentication of your own. Having own authentication mechanism has both advantages and disadvantages. The disadvantage is that you need to handle storing hashed passwords, flows like forgot password, reset password, etc. The advantage is that you have more control over the app and you don't have to rely on third-party.
In this tutorial, we will see how we can implement an authentication mechanism of our own. That is using traditional registration and login using username and password.
We will be using:
- Passport as the middleware for Node.js.
- MongoDB for storing user details.
- JWT for identifying the user request.
- Refresh tokens for renewing the JWT.
Application architecture
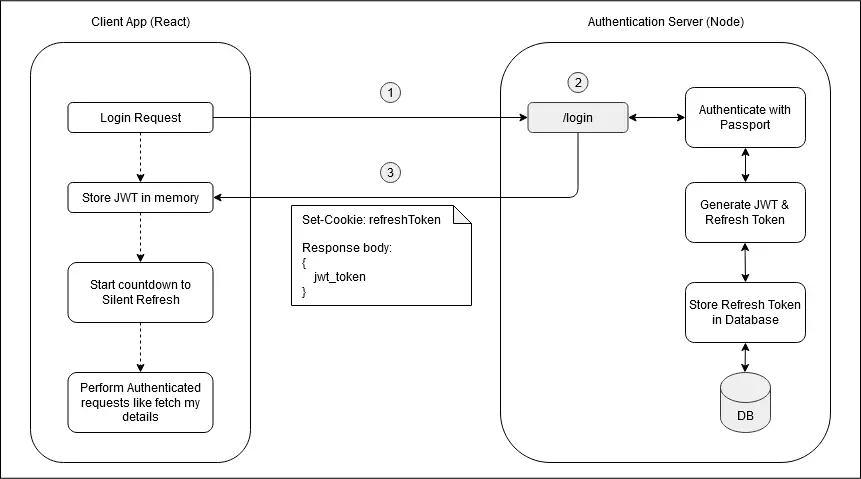
This is how our login flow will look like:
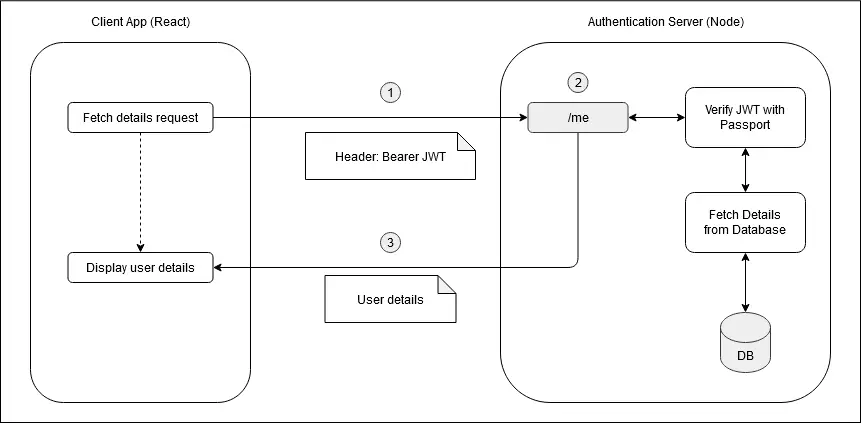
This is how an authenticated request would look like:
Why both JWT and Refresh tokens and What is silent refresh?
You might be already aware when we use JWT for authentication, we do not store the JWT in the back end. We identify the user by retrieving the information from the JWT with the help of the secret used to create the JWT. So there is no way for the server to invalidate a JWT (unless we change JWT secret, which would log out all the users!) or to identify whether the request is coming from a legitimate client or not. Due to this JWTs are created to have a short expiry time (eg: 15 minutes, which might vary depending upon the criticality of the application), so that even if the JWT is stolen, the attacker will not be able to use it for a longer duration.
The problem with having short expiration of JWT is that it would logout the user frequently,
which is definitely not a great user experience.
To tackle this problem, we introduce refresh tokens, which will have a very long expiration time (say 30 days).
Unlike JWT, the refresh token is stored in the cookie which is created in the server (HTTP only, Secure),
thus preventing any vulnerable javascript reading the refreshToken cookie (XSS attack).
Refresh tokens are created and are stored in the database during login/registration and set into the cookie.
After every short interval (say 5 minutes, which is less than the JWT expiration time),
/refreshToken endpoint will be called in the background (Silent Refresh) to renew both the JWT and refreshToken as shown below:
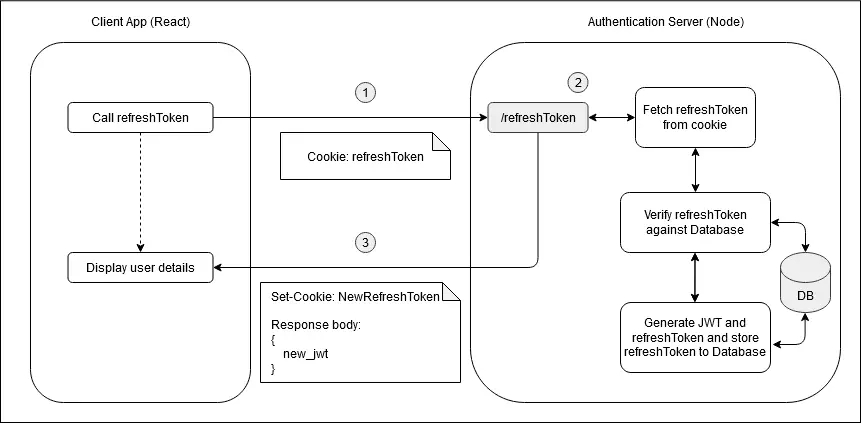
Also, since refreshToken is stored in the database,
we can invalidate a user session easily by deleting the refresh token or marking it is invalid in the database.
Why JWT is stored in the memory? Why not localStorage?
You might have observed in many blogs and videos informing not to store JWT or any authentication details in local storage or client-side cookies. The reason they might have provided is local storage and client-side cookies are prone to XSS attack. However, storing JWT in the memory does not prevent reading it if there is an XSS vulnerability, it just makes it a bit difficult for the attacker to read it. So the goal must be to develop the application without XSS vulnerability (or any other for that matter) and not to worry about where to store the JWT!
You can read a wonderful article describing why avoiding LocalStorage for tokens is the wrong solution
Why not SameSite cookies?
You might be wondering why not use one SameSite cookies with HTTPOnly and Secure to store the user session? The problem with this approach is:
- SameSite cookies require both client and server to be in the same domain. So if your client is deployed in a different domain, you will not be able to make use of it.
- SameSite cookies are not fully implemented in few browsers.
Other advantages of using JWT:
- Since JWT need not be verified against the database, it improves the performance by avoiding the database call in every request.
- Since JWT is stored on the client-side, it helps in preventing XSRF/CSRF attacks.
Implementing the server-side
Create a new Node.js project using the following command:
1npm init -y
Open the directory where you have run the above command in your favorite code editor update the package.json file with the start script:
1{2 "name": "mern-auth-server",3 "version": "1.0.0",4 "description": "",5 "main": "index.js",6 "scripts": {7 "start": "node index.js",8 "test": "echo \"Error: no test specified\" && exit 1"9 },10 "keywords": [],11 "author": "",12 "license": "ISC"13}
Now run the following command to install the packages:
1yarn add express dotenv mongoose body-parser cors cookie-parser
- express - Used to create a web framework with Node.js.
- dotenv - Loads environment variables from
.envfile. - mongoose - ODM for mongoDB.
- body-parser - Parses the request body from the requests like POST request.
- cors - Enabling CORS policies for the client URL.
- cookie-parser - To create and read
refreshTokencookie.
Now let's create a file named .env in the root directory of the project.
This file will have all the configurations and secrets used by the server. You will come across these variables throughout this post.
1JWT_SECRET = jdhdhd-kjfjdhrhrerj-uurhr-jjge2REFRESH_TOKEN_SECRET = fgkjddshfdjh773bdjsj84-jdjd7743SESSION_EXPIRY = 60 * 154REFRESH_TOKEN_EXPIRY = 60 * 60 * 24 * 305MONGO_DB_CONNECTION_STRING = mongodb://127.0.0.1:27017/mern_auth6COOKIE_SECRET = jhdshhds884hfhhs-ew6dhjd7WHITELISTED_DOMAINS = http://localhost:3000
.env files with production secrets should not be pushed to the code base. In a deployed environment, set environment variables in the server configuration.
Create a directory named utils and create a file called connectdb.js inside it:
1const mongoose = require("mongoose")2const url = process.env.MONGO_DB_CONNECTION_STRING3const connect = mongoose.connect(url, {4 useNewUrlParser: true,5 useUnifiedTopology: true,6 useCreateIndex: true,7})8connect9 .then(db => {10 console.log("connected to db")11 })12 .catch(err => {13 console.log(err)14 })
As the name indicates, it helps in connecting to the MongoDB instance specified in .env file.
You may use either a local instance or
connect to a cloud provider like MongoDB Atlas.
Now create a file named index.js with the following code:
1const express = require("express")2const cors = require("cors")3const bodyParser = require("body-parser")4const cookieParser = require("cookie-parser")56if (process.env.NODE_ENV !== "production") {7 // Load environment variables from .env file in non prod environments8 require("dotenv").config()9}10require("./utils/connectdb")1112const app = express()1314app.use(bodyParser.json())15app.use(cookieParser(process.env.COOKIE_SECRET))1617//Add the client URL to the CORS policy1819const whitelist = process.env.WHITELISTED_DOMAINS20 ? process.env.WHITELISTED_DOMAINS.split(",")21 : []2223const corsOptions = {24 origin: function (origin, callback) {25 if (!origin || whitelist.indexOf(origin) !== -1) {26 callback(null, true)27 } else {28 callback(new Error("Not allowed by CORS"))29 }30 },3132 credentials: true,33}3435app.use(cors(corsOptions))3637app.get("/", function (req, res) {38 res.send({ status: "success" })39})4041//Start the server in port 80814243const server = app.listen(process.env.PORT || 8081, function () {44 const port = server.address().port4546 console.log("App started at port:", port)47})
Here we spin up the server at port 8081 and wire up the route / with a success response.
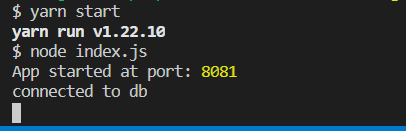
Start the server using the following command (you may use npm start or nodemon):
1yarn start
Now in the console, you should be able to see the following output:
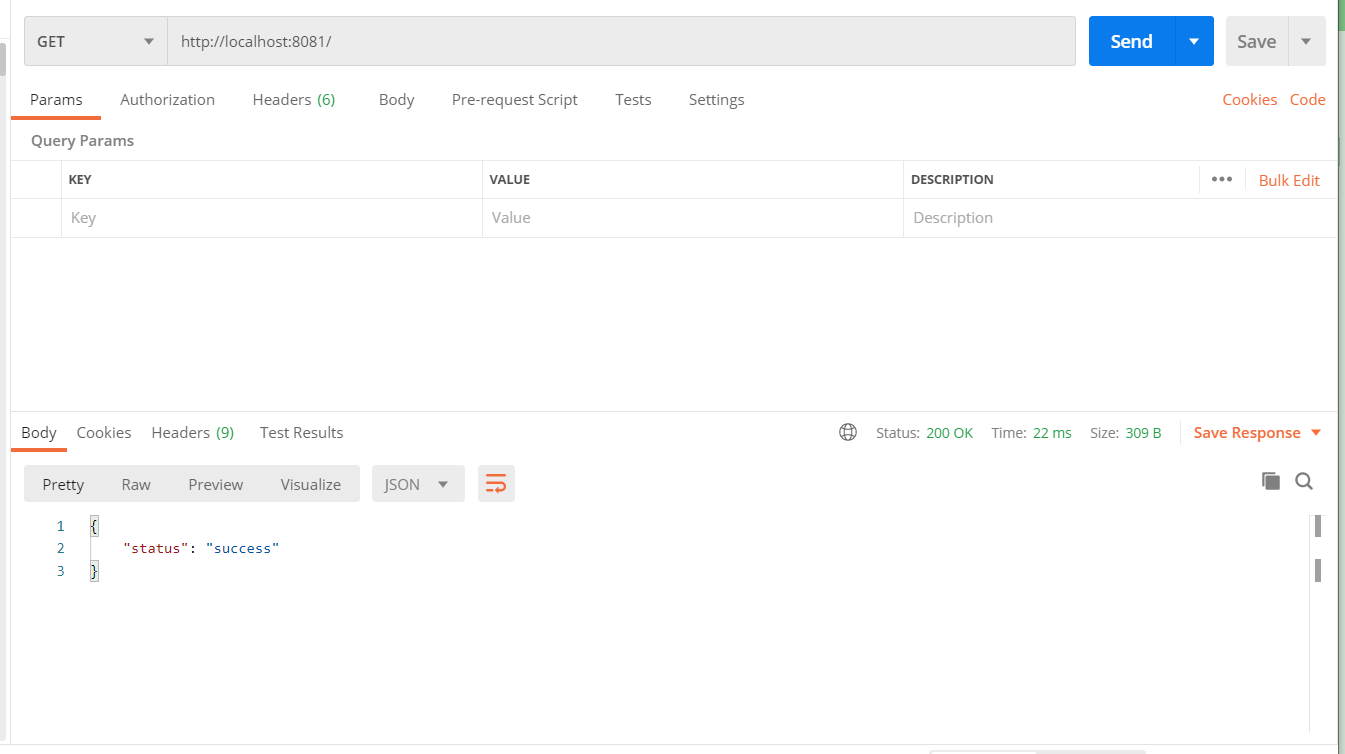
If you open the URL http://localhost:8081 in browser or postman, you will see the success response as shown below:
Now that we have our basic setup ready, let's dive into the authentication part.
Passport js
Passport is a Node.js middleware used for authentication. It has different strategies written based on the type of authentication we would like to use. It has strategies for local authentication using username and password and also for social logins like Google and Facebook.
Installing passport related packages
Let's install the following packages:
1yarn add passport passport-jwt passport-local passport-local-mongoose jsonwebtoken
- passport-jwt - Passport strategy to authenticate using JWT for further requests after login/registration.
- passport-local - Passport strategy for authenticating with a username and password during login & sign up.
- passport-local-mongoose - Mongoose plugin that helps in building username and password login using passport.
- jsonwebtoken - Helps in creating and verifying JWT.
Creating the user model
Now let's create the user model. Create a folder named models and a file called user.js inside it with the following code:
1const mongoose = require("mongoose")2const Schema = mongoose.Schema34const passportLocalMongoose = require("passport-local-mongoose")56const Session = new Schema({7 refreshToken: {8 type: String,9 default: "",10 },11})1213const User = new Schema({14 firstName: {15 type: String,16 default: "",17 },18 lastName: {19 type: String,20 default: "",21 },22 authStrategy: {23 type: String,24 default: "local",25 },26 points: {27 type: Number,28 default: 50,29 },30 refreshToken: {31 type: [Session],32 },33})3435//Remove refreshToken from the response36User.set("toJSON", {37 transform: function (doc, ret, options) {38 delete ret.refreshToken39 return ret40 },41})4243User.plugin(passportLocalMongoose)4445module.exports = mongoose.model("User", User)
Here we are declaring 2 schemas, one for storing the refresh tokens and another to store user details like the first name, last name, authentication strategy, points (which will be displayed to the user once they log in), and an array of refresh tokens (to support sign in from multiple devices at the same time).
Also, We have removed the refresh token from the toJSON function,
so that we don't expose user's refresh tokens whenever we serialize the model and send the data in the API response.
passport-local-mongoose plugin provides functions like authenticate and serializeUser, which we will see in the coming sections.
Creating Local strategy
Now let's create the local strategy, which will be used while login and registration:
Create a folder called strategies and a file named LocalStrategy.js inside it.
Local Strategy makes use of the methods provided by passport-local-mongoose for authentication and serializing the user.
1const passport = require("passport")2const LocalStrategy = require("passport-local").Strategy3const User = require("../models/user")45//Called during login/sign up.6passport.use(new LocalStrategy(User.authenticate()))78//called while after logging in / signing up to set user details in req.user9passport.serializeUser(User.serializeUser())
Creating JWT Strategy
Similar to the local strategy, create a file named JwtStrategy.js inside the strategies folder with the following code:
1const passport = require("passport")2const JwtStrategy = require("passport-jwt").Strategy,3 ExtractJwt = require("passport-jwt").ExtractJwt4const User = require("../models/user")56const opts = {}7opts.jwtFromRequest = ExtractJwt.fromAuthHeaderAsBearerToken()8opts.secretOrKey = process.env.JWT_SECRET910// Used by the authenticated requests to deserialize the user,11// i.e., to fetch user details from the JWT.12passport.use(13 new JwtStrategy(opts, function (jwt_payload, done) {14 // Check against the DB only if necessary.15 // This can be avoided if you don't want to fetch user details in each request.16 User.findOne({ _id: jwt_payload._id }, function (err, user) {17 if (err) {18 return done(err, false)19 }20 if (user) {21 return done(null, user)22 } else {23 return done(null, false)24 // or you could create a new account25 }26 })27 })28)
As you could see we are using fromAuthHeaderAsBearerToken function, specifying JwtStrategy
to extract the JWT from the authentication bearer header.
We will see how to pass the JWT in the authentication header in the upcoming sections.
You will find other extractors supported by passport here.
Creating authentication related functions
Now let's create few functions used for authentication. Create a file called authenticate.js inside the root directory with the following code:
1const passport = require("passport")2const jwt = require("jsonwebtoken")3const dev = process.env.NODE_ENV !== "production"45exports.COOKIE_OPTIONS = {6 httpOnly: true,7 // Since localhost is not having https protocol,8 // secure cookies do not work correctly (in postman)9 secure: !dev,10 signed: true,11 maxAge: eval(process.env.REFRESH_TOKEN_EXPIRY) * 1000,12 sameSite: "none",13}1415exports.getToken = user => {16 return jwt.sign(user, process.env.JWT_SECRET, {17 expiresIn: eval(process.env.SESSION_EXPIRY),18 })19}2021exports.getRefreshToken = user => {22 const refreshToken = jwt.sign(user, process.env.REFRESH_TOKEN_SECRET, {23 expiresIn: eval(process.env.REFRESH_TOKEN_EXPIRY),24 })25 return refreshToken26}2728exports.verifyUser = passport.authenticate("jwt", { session: false })
COOKIE_OPTIONSis used for creating the refresh token cookie, which should be httpOnly and secure so that it cannot be read by the client javascript. SameSite is set to "None" since client and server will be in different domains.getTokenis used to create the JWT.getRefreshTokenis used to create the refresh token, which itself is a JWT.verifyUseris a middleware that needs to be called for every authenticated request.
Creating the user router
Create a folder called routes and a file named userRoutes.js inside it with the following code:
1const express = require("express")2const router = express.Router()3const User = require("../models/user")45const { getToken, COOKIE_OPTIONS, getRefreshToken } = require("../authenticate")67router.post("/signup", (req, res, next) => {8 // Verify that first name is not empty9 if (!req.body.firstName) {10 res.statusCode = 50011 res.send({12 name: "FirstNameError",13 message: "The first name is required",14 })15 } else {16 User.register(17 new User({ username: req.body.username }),18 req.body.password,19 (err, user) => {20 if (err) {21 res.statusCode = 50022 res.send(err)23 } else {24 user.firstName = req.body.firstName25 user.lastName = req.body.lastName || ""26 const token = getToken({ _id: user._id })27 const refreshToken = getRefreshToken({ _id: user._id })28 user.refreshToken.push({ refreshToken })29 user.save((err, user) => {30 if (err) {31 res.statusCode = 50032 res.send(err)33 } else {34 res.cookie("refreshToken", refreshToken, COOKIE_OPTIONS)35 res.send({ success: true, token })36 }37 })38 }39 }40 )41 }42})4344module.exports = router
Here we are defining the route /signup for registration.
It calls the register function from the passport-local-mongoose plugin with
username and password and a callback, which will be called once the user is registered.
When the user is successfully registered, we generate the authentication token (JWT) and the refresh token.
We save the first name and the last name to the database along with the refresh token.
On successfully saving the details to the database, refreshToken cookie is created and
the authentication token (JWT) is sent in the response body.
Now, let's include all these files in index.js :
1const express = require("express")2const cors = require("cors")3const bodyParser = require("body-parser")4const cookieParser = require("cookie-parser")5const passport = require("passport")67if (process.env.NODE_ENV !== "production") {8 // Load environment variables from .env file in non prod environments9 require("dotenv").config()10}11require("./utils/connectdb")1213require("./strategies/JwtStrategy")14require("./strategies/LocalStrategy")15require("./authenticate")1617const userRouter = require("./routes/userRoutes")1819const app = express()2021app.use(bodyParser.json())22app.use(cookieParser(process.env.COOKIE_SECRET))2324//Add the client URL to the CORS policy2526const whitelist = process.env.WHITELISTED_DOMAINS27 ? process.env.WHITELISTED_DOMAINS.split(",")28 : []2930const corsOptions = {31 origin: function (origin, callback) {32 if (!origin || whitelist.indexOf(origin) !== -1) {33 callback(null, true)34 } else {35 callback(new Error("Not allowed by CORS"))36 }37 },3839 credentials: true,40}4142app.use(cors(corsOptions))4344app.use(passport.initialize())4546app.use("/users", userRouter)4748app.get("/", function (req, res) {49 res.send({ status: "success" })50})5152//Start the server in port 80815354const server = app.listen(process.env.PORT || 8081, function () {55 const port = server.address().port5657 console.log("App started at port:", port)58})
Testing using postman
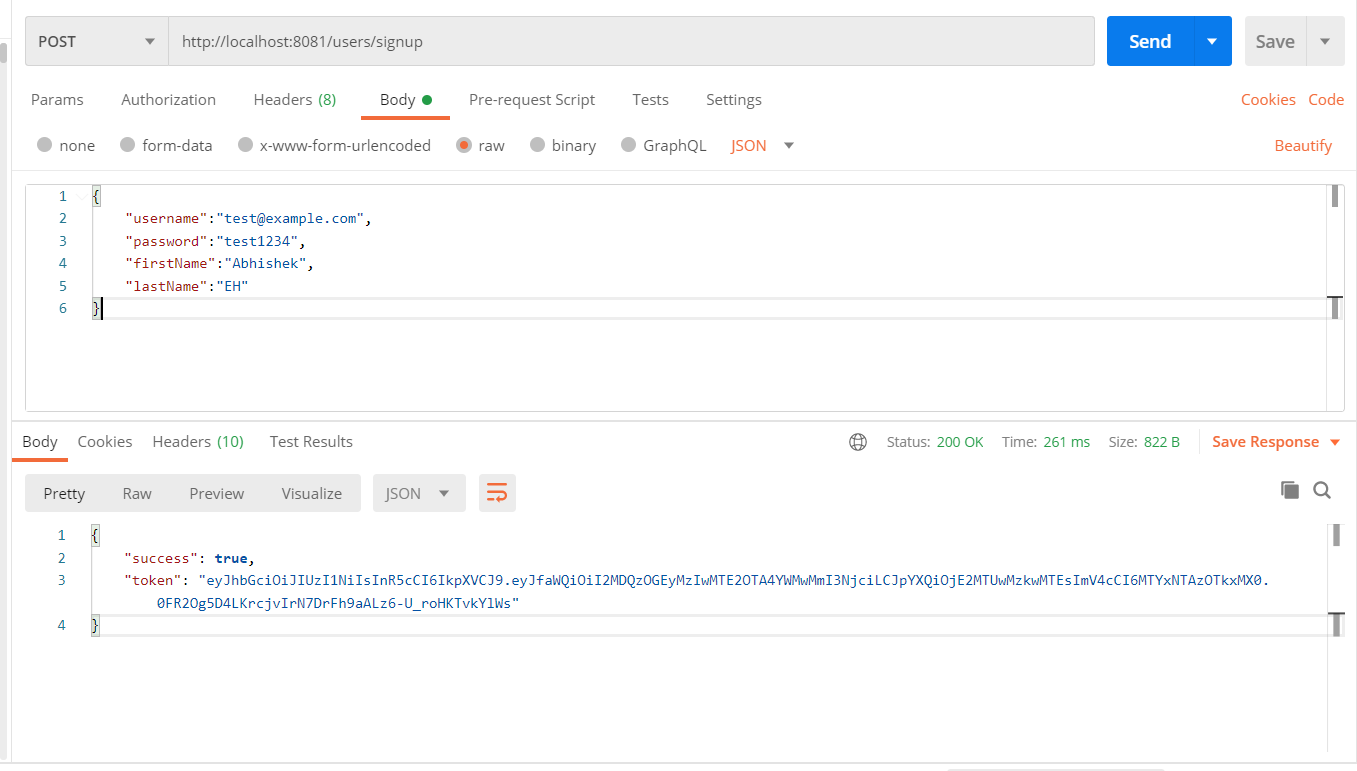
Now if you make a post request to the URL: http://localhost:8081/users/signup,
with username, password, firstName, and lastName, you should be able to see the token generated in the response.
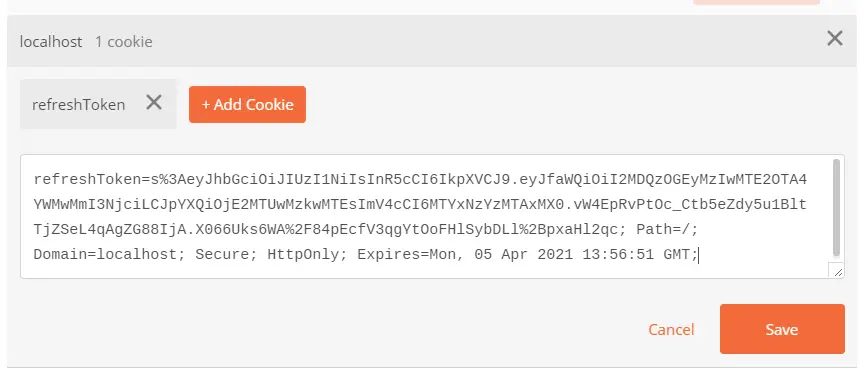
If you click on the Cookies, you will be able to see the refreshToken cookie:
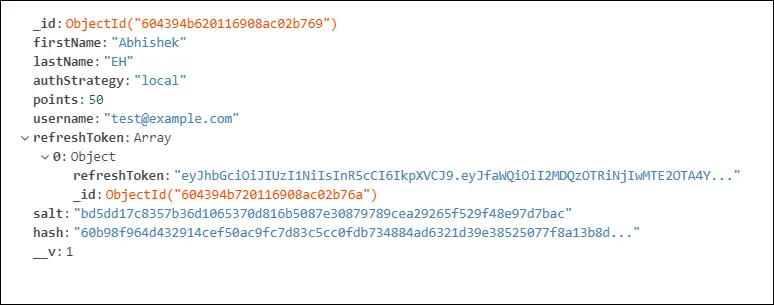
If you check the database, you should be able to see the user entry created there:
Creating the login route
Now that we have a way to register the user, let's add the login route to userRoutes.js:
1const express = require("express")2const router = express.Router()3const User = require("../models/user")4const passport = require("passport")56const { getToken, COOKIE_OPTIONS, getRefreshToken } = require("../authenticate")78// ...910router.post("/login", passport.authenticate("local"), (req, res, next) => {11 const token = getToken({ _id: req.user._id })12 const refreshToken = getRefreshToken({ _id: req.user._id })13 User.findById(req.user._id).then(14 user => {15 user.refreshToken.push({ refreshToken })16 user.save((err, user) => {17 if (err) {18 res.statusCode = 50019 res.send(err)20 } else {21 res.cookie("refreshToken", refreshToken, COOKIE_OPTIONS)22 res.send({ success: true, token })23 }24 })25 },26 err => next(err)27 )28})2930module.exports = router
Here we are wiring up the local authentication strategy by calling passport.authenticate("local").
Only if the credentials are valid, then the control will come to the body of the login route.
If the user is successfully logged in, then we generate the authentication token and refresh token.
We save the refresh token to the database and set it in the response cookie.
The authentication token (JWT) will be sent in the response body so that the client can attach it to the follow-up request.
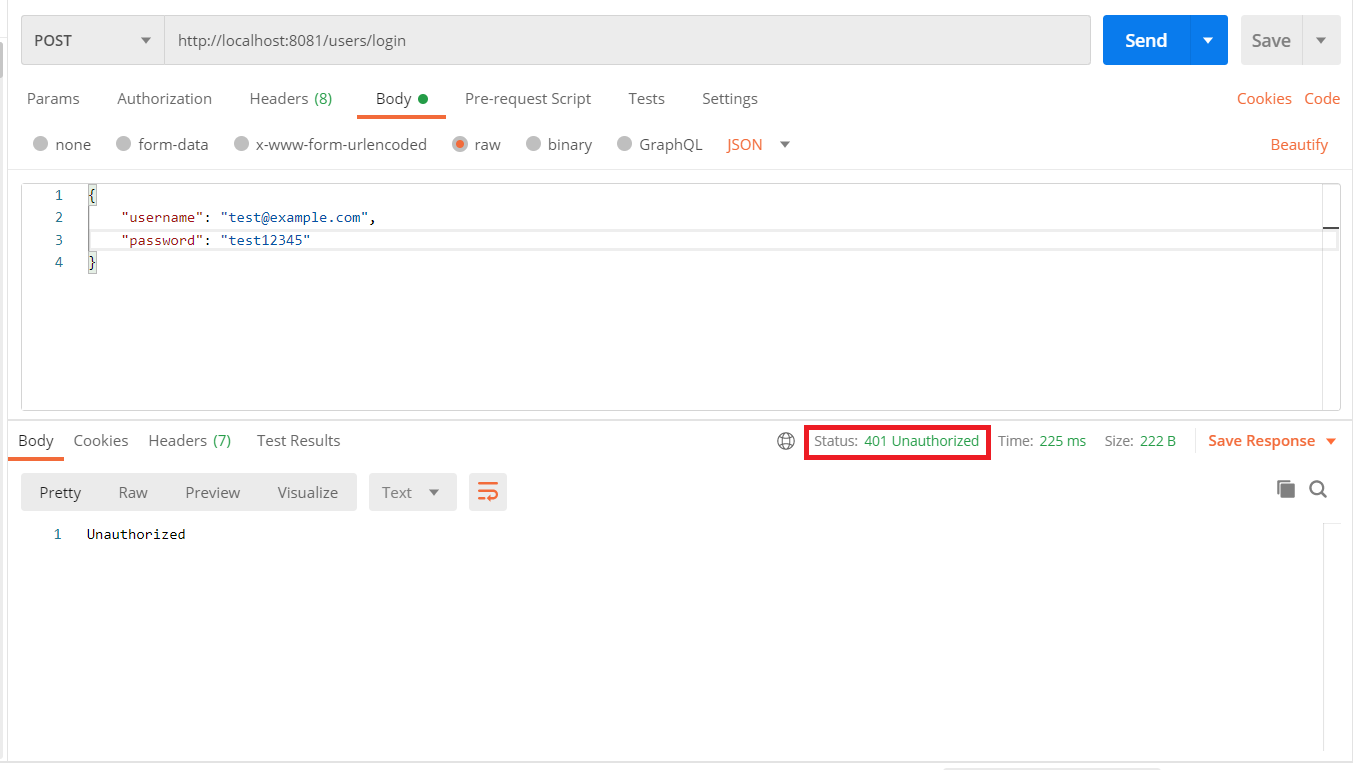
If we test it using postman, you will be able to see the response as shown below:

If you have provided invalid credentials, then you would get the response as "Unauthorized" with the response code of 401.
Creating refreshToken route
We have seen earlier that we would be doing silent refresh by calling /refreshToken endpoint in order to get a new authentication token (JWT).
Now let's update userRoutes.js with /refreshToken route:
1// ...2const jwt = require("jsonwebtoken")34//...56router.post("/refreshToken", (req, res, next) => {7 const { signedCookies = {} } = req8 const { refreshToken } = signedCookies910 if (refreshToken) {11 try {12 const payload = jwt.verify(refreshToken, process.env.REFRESH_TOKEN_SECRET)13 const userId = payload._id14 User.findOne({ _id: userId }).then(15 user => {16 if (user) {17 // Find the refresh token against the user record in database18 const tokenIndex = user.refreshToken.findIndex(19 item => item.refreshToken === refreshToken20 )2122 if (tokenIndex === -1) {23 res.statusCode = 40124 res.send("Unauthorized")25 } else {26 const token = getToken({ _id: userId })27 // If the refresh token exists, then create new one and replace it.28 const newRefreshToken = getRefreshToken({ _id: userId })29 user.refreshToken[tokenIndex] = { refreshToken: newRefreshToken }30 user.save((err, user) => {31 if (err) {32 res.statusCode = 50033 res.send(err)34 } else {35 res.cookie("refreshToken", newRefreshToken, COOKIE_OPTIONS)36 res.send({ success: true, token })37 }38 })39 }40 } else {41 res.statusCode = 40142 res.send("Unauthorized")43 }44 },45 err => next(err)46 )47 } catch (err) {48 res.statusCode = 40149 res.send("Unauthorized")50 }51 } else {52 res.statusCode = 40153 res.send("Unauthorized")54 }55})5657//...
Here,
- We retrieve the refresh token from the signed cookies.
- We verify the refresh token against the secret used to create the refresh token and extract the payload (which contains the user id) from it.
- Then we find if the refresh token still exists in the database (in case of logout from all devices, all the refresh tokens belonging to the user will be deleted and the user will be forced to log in again).
- If it exists in the database, then we replace it with the newly created refresh token.
- Similar to login & registration steps, here also we will be setting the refresh token in the response cookie and authentication token (JWT) in the response body.
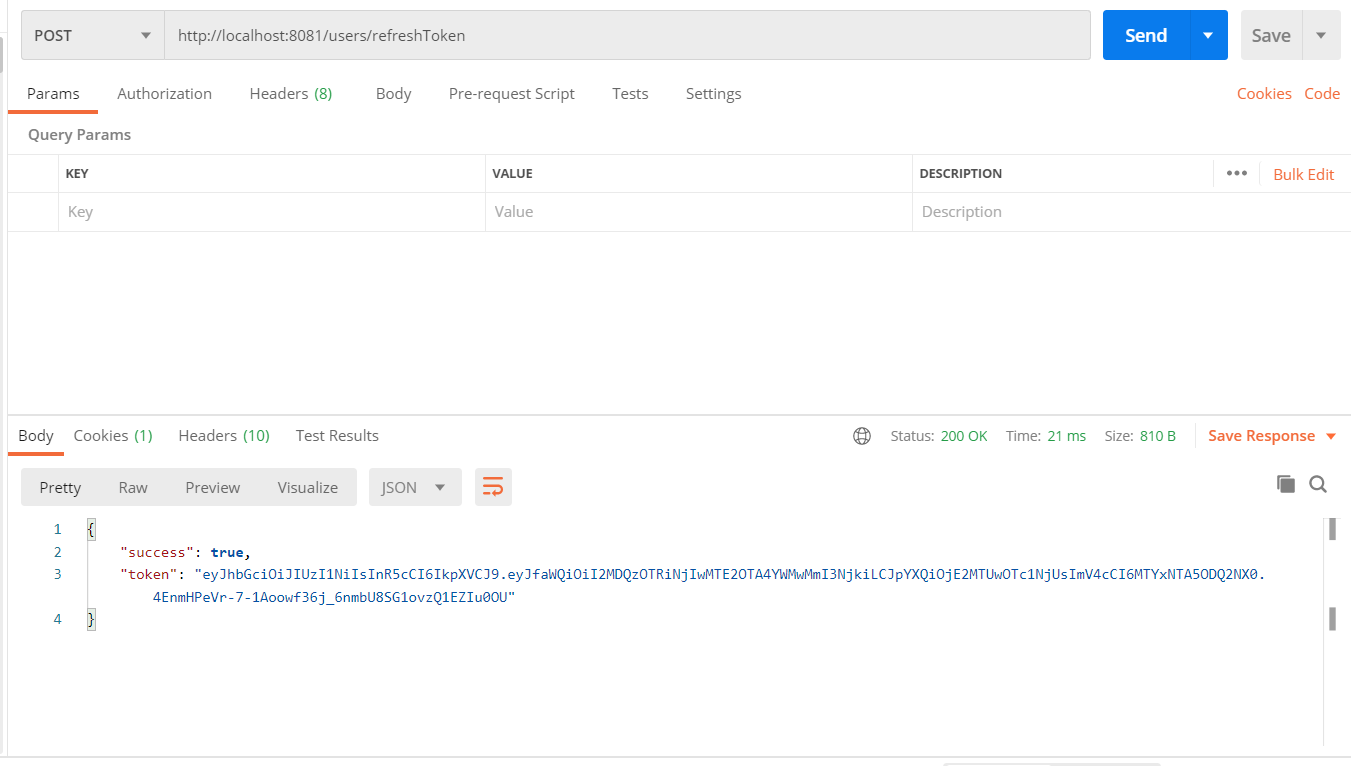
If we test it in postman you will see that new refresh token created each time:
Endpoint to fetch user details
Now let's have an endpoint to fetch the logged in user details:
1// ...2const {3 getToken,4 COOKIE_OPTIONS,5 getRefreshToken,6 verifyUser,7} = require("../authenticate")89// ...10router.get("/me", verifyUser, (req, res, next) => {11 res.send(req.user)12})1314// ...
Here we are calling the verifyUser middleware, which in turn will call the JWT strategy to verify the JWT and fetch the user details.
If you are not fetching the user details inside the JWT strategy,
then you can explicitly fetch it in the body of the route,
before sending the user details in the response.
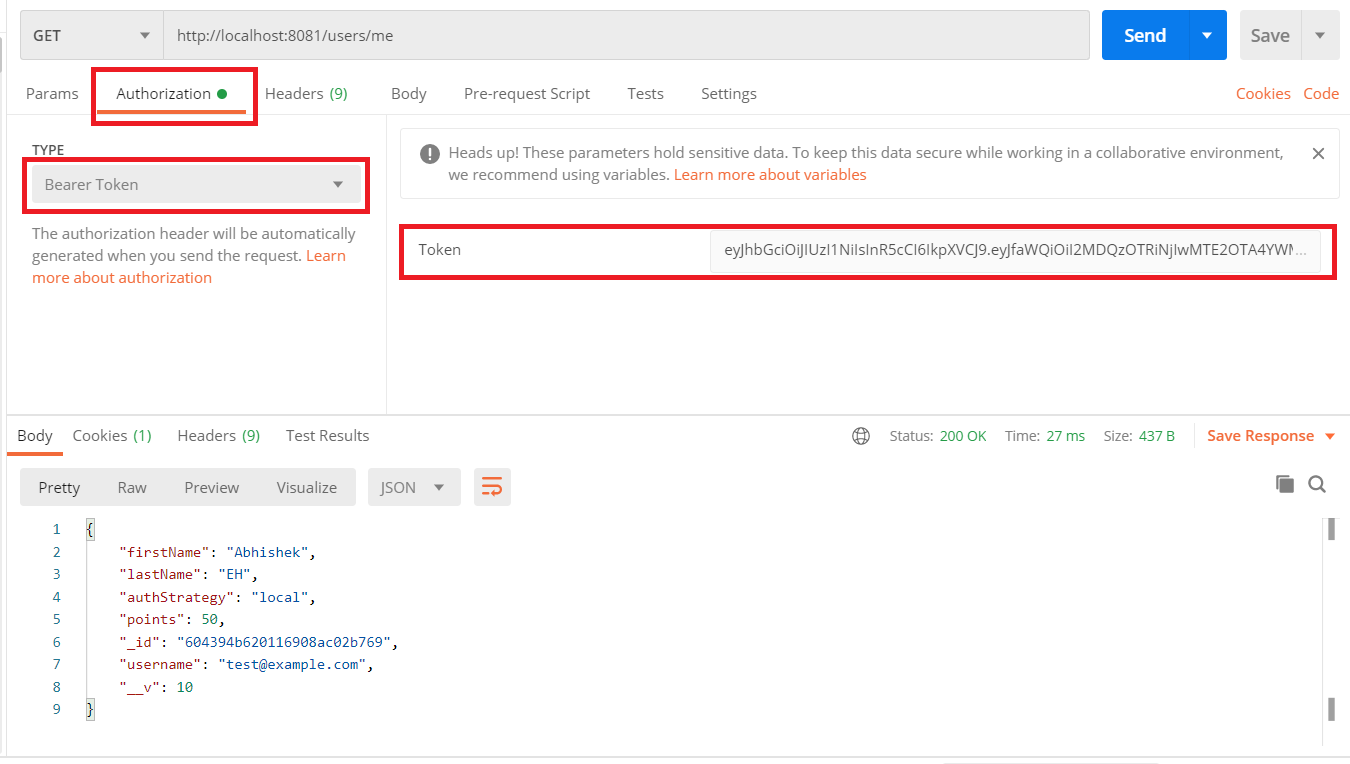
In order to fetch the user details you need to pass the authentication token (JWT) received in the login/sign up response in postman as shown below:
Creating the logout route
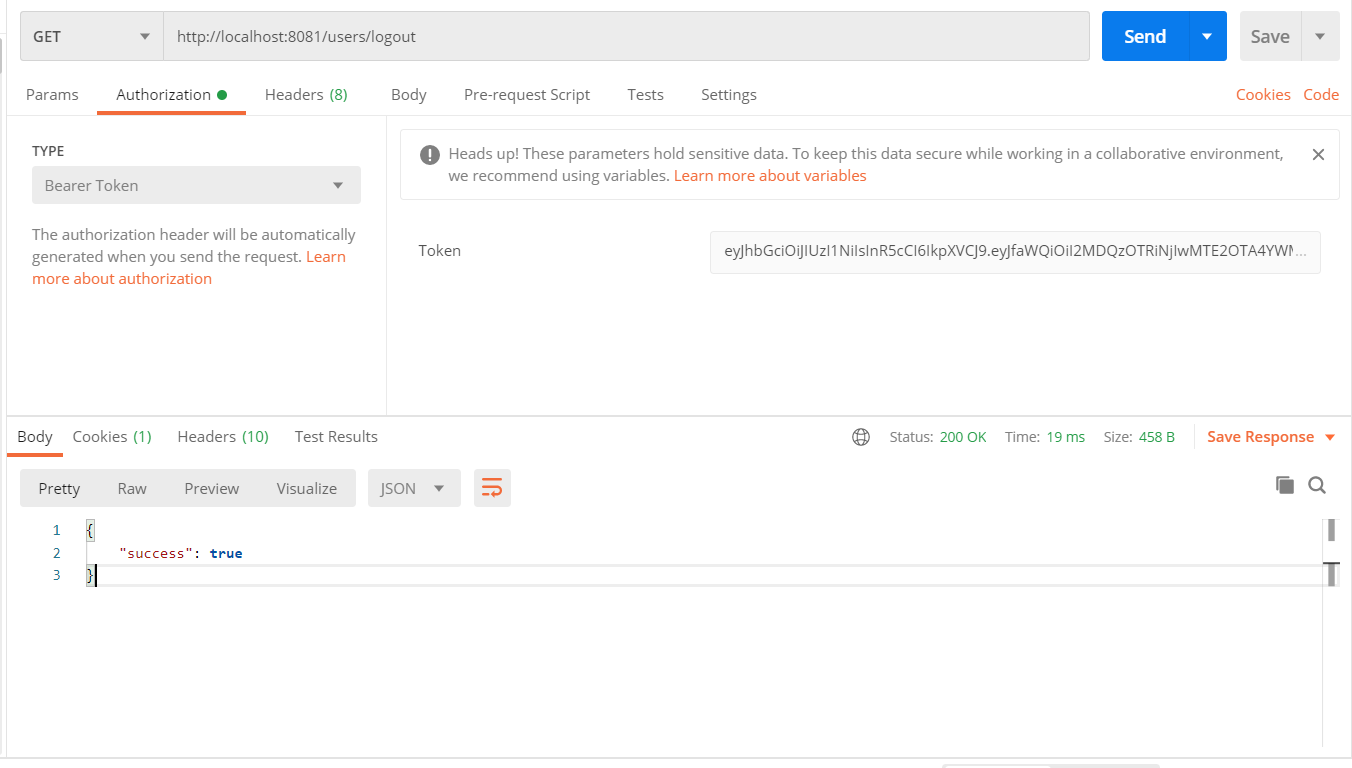
Before moving to the front end, let's create one final route, which will be used to log the user out.
1// ...2router.get("/logout", verifyUser, (req, res, next) => {3 const { signedCookies = {} } = req4 const { refreshToken } = signedCookies5 User.findById(req.user._id).then(6 user => {7 const tokenIndex = user.refreshToken.findIndex(8 item => item.refreshToken === refreshToken9 )1011 if (tokenIndex !== -1) {12 user.refreshToken.id(user.refreshToken[tokenIndex]._id).remove()13 }1415 user.save((err, user) => {16 if (err) {17 res.statusCode = 50018 res.send(err)19 } else {20 res.clearCookie("refreshToken", COOKIE_OPTIONS)21 res.send({ success: true })22 }23 })24 },25 err => next(err)26 )27})28// ...
Here we are extracting the refresh token cookie and deleting it from the database as well as from the cookie. Deleting of the authentication token (JWT), which is stored in browser memory will happen in front end.
Implementing the front end
Create a new react project using the following command
1npx create-react-app mern-auth-client
Adding BlueprintJS for styling
We will be making use of BlueprintJS in order to style the app. So let's install it:
1yarn add @blueprintjs/core
In the index.css file, let's include the css files related to BlueprintJS:
1@import "~normalize.css";2@import "~@blueprintjs/core/lib/css/blueprint.css";3@import "~@blueprintjs/icons/lib/css/blueprint-icons.css";4body {5 margin: 0 auto;6 max-width: 400px;7}
Also, note that we have added styles to center align the page contents.
Creating login and registration components
Now let's create Login and Registration components using BlueprintJS:
1import { Button, FormGroup, InputGroup } from "@blueprintjs/core"2import React, { useState } from "react"34const Login = () => {5 const [email, setEmail] = useState("")6 const [password, setPassword] = useState("")78 return (9 <>10 <form className="auth-form">11 <FormGroup label="Email" labelFor="email">12 <InputGroup13 id="email"14 placeholder="Email"15 type="email"16 value={email}17 onChange={e => setEmail(e.target.value)}18 />19 </FormGroup>20 <FormGroup label="Password" labelFor="password">21 <InputGroup22 id="password"23 placeholder="Password"24 type="password"25 value={password}26 onChange={e => setPassword(e.target.value)}27 />28 </FormGroup>29 <Button intent="primary" fill type="submit" text="Sign In" />30 </form>31 </>32 )33}3435export default Login
Here we are having username and password fields and a submit button. We are making use of local states to store the value of email and password and we have wired them to the on change handlers.
Let's add some margin for the form:
1@import "~normalize.css";2@import "~@blueprintjs/core/lib/css/blueprint.css";3@import "~@blueprintjs/icons/lib/css/blueprint-icons.css";4body {5 margin: 0 auto;6 max-width: 400px;7}89.auth-form {10 margin-top: 10px;11}
Similarly, let's create the registration page:
1import { Button, FormGroup, InputGroup } from "@blueprintjs/core"2import React, { useState } from "react"34const Register = () => {5 const [firstName, setFirstName] = useState("")6 const [lastName, setLastName] = useState("")7 const [email, setEmail] = useState("")8 const [password, setPassword] = useState("")910 return (11 <>12 <form className="auth-form">13 <FormGroup label="First Name" labelFor="firstName">14 <InputGroup15 id="firstName"16 placeholder="First Name"17 onChange={e => setFirstName(e.target.value)}18 value={firstName}19 />20 </FormGroup>21 <FormGroup label="Last Name" labelFor="firstName">22 <InputGroup23 id="lastName"24 placeholder="Last Name"25 onChange={e => setLastName(e.target.value)}26 value={lastName}27 />28 </FormGroup>29 <FormGroup label="Email" labelFor="email">30 <InputGroup31 id="email"32 type="email"33 placeholder="Email"34 onChange={e => setEmail(e.target.value)}35 value={email}36 />37 </FormGroup>38 <FormGroup label="Password" labelFor="password">39 <InputGroup40 id="password"41 placeholder="Password"42 type="password"43 onChange={e => setPassword(e.target.value)}44 value={password}45 />46 </FormGroup>47 <Button intent="primary" text="Register" fill type="submit" />48 </form>49 </>50 )51}5253export default Register
Now in the App.js, let's include both Login and Register components:
1import { Card, Tab, Tabs } from "@blueprintjs/core"2import { useState } from "react"3import Login from "./Login"4import Register from "./Register"56function App() {7 const [currentTab, setCurrentTab] = useState("login")89 return (10 <Card elevation="1">11 <Tabs id="Tabs" onChange={setCurrentTab} selectedTabId={currentTab}>12 <Tab id="login" title="Login" panel={<Login />} />13 <Tab id="register" title="Register" panel={<Register />} />14 <Tabs.Expander />15 </Tabs>16 </Card>17 )18}1920export default App
Here we are making use of the Tabs component from BlueprintJS along with the local react state to determine the currently active tab.
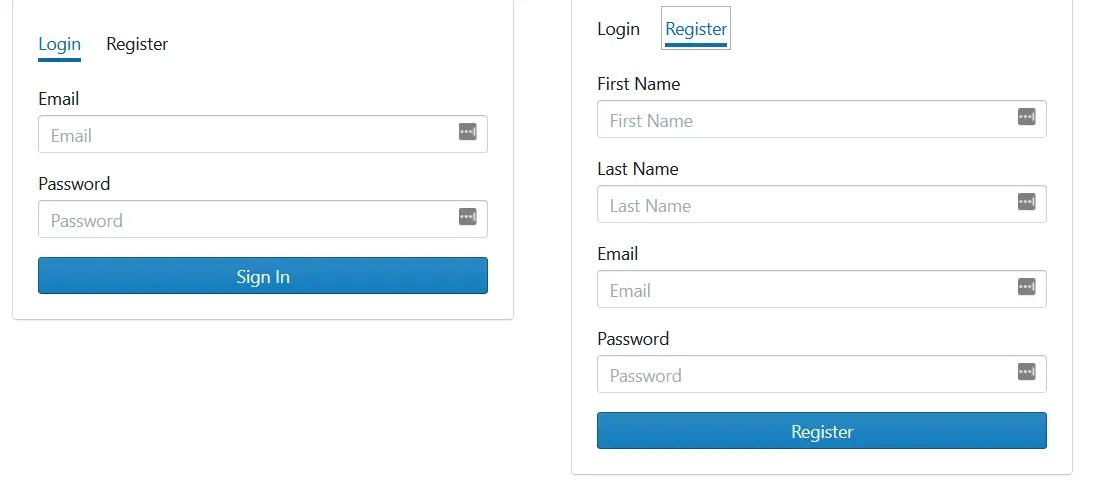
If you open http://localhost:3000/ in your browser you should be able to switch between login and registration forms:
Creating the user context
Before we submit the login and registration forms, let's create a custom react context to store the user token and details. In my previous post, I've explained how to create and use the react context for state management.
Create a folder named context and a file called UserContext.js inside it.
1import React, { useState } from "react"23const UserContext = React.createContext([{}, () => {}])45let initialState = {}67const UserProvider = props => {8 const [state, setState] = useState(initialState)910 return (11 <UserContext.Provider value={[state, setState]}>12 {props.children}13 </UserContext.Provider>14 )15}1617export { UserContext, UserProvider }
Add the provider to index.js:
1import React from "react"2import ReactDOM from "react-dom"3import "./index.css"4import App from "./App"5import { UserProvider } from "./context/UserContext"67ReactDOM.render(8 <React.StrictMode>9 <UserProvider>10 <App />11 </UserProvider>12 </React.StrictMode>,13 document.getElementById("root")14)
Submitting the login and registration forms:
Now let's bind a submit handler to our login form:
1import { Button, Callout, FormGroup, InputGroup } from "@blueprintjs/core"2import React, { useContext, useState } from "react"3import { UserContext } from "./context/UserContext"45const Login = () => {6 const [isSubmitting, setIsSubmitting] = useState(false)7 const [error, setError] = useState("")8 const [email, setEmail] = useState("")9 const [password, setPassword] = useState("")10 const [userContext, setUserContext] = useContext(UserContext)1112 const formSubmitHandler = e => {13 e.preventDefault()14 setIsSubmitting(true)15 setError("")1617 const genericErrorMessage = "Something went wrong! Please try again later."1819 fetch(process.env.REACT_APP_API_ENDPOINT + "users/login", {20 method: "POST",21 credentials: "include",22 headers: { "Content-Type": "application/json" },23 body: JSON.stringify({ username: email, password }),24 })25 .then(async response => {26 setIsSubmitting(false)27 if (!response.ok) {28 if (response.status === 400) {29 setError("Please fill all the fields correctly!")30 } else if (response.status === 401) {31 setError("Invalid email and password combination.")32 } else {33 setError(genericErrorMessage)34 }35 } else {36 const data = await response.json()37 setUserContext(oldValues => {38 return { ...oldValues, token: data.token }39 })40 }41 })42 .catch(error => {43 setIsSubmitting(false)44 setError(genericErrorMessage)45 })46 }47 return (48 <>49 {error && <Callout intent="danger">{error}</Callout>}50 <form onSubmit={formSubmitHandler} className="auth-form">51 <FormGroup label="Email" labelFor="email">52 <InputGroup53 id="email"54 placeholder="Email"55 type="email"56 value={email}57 onChange={e => setEmail(e.target.value)}58 />59 </FormGroup>60 <FormGroup label="Password" labelFor="password">61 <InputGroup62 id="password"63 placeholder="Password"64 type="password"65 value={password}66 onChange={e => setPassword(e.target.value)}67 />68 </FormGroup>69 <Button70 intent="primary"71 disabled={isSubmitting}72 text={`${isSubmitting ? "Signing In" : "Sign In"}`}73 fill74 type="submit"75 />76 </form>77 </>78 )79}8081export default Login
In the above code,
- We have introduced two additional local states.
- First, the
isSubmittingis used for disabling the sign-in button when the user has already pressed it. It is also used to display the text "Signing In" in order to inform the user of what is happening. - We have an error state, which is used to display an appropriate error message to the user in case of login fails.
- In
formSubmitHandler, we are disabling the default submission of the form usinge.preventDefault(). - We are making a POST call to the endpoint
/users/login, created earlier in the server project with the username and password parameters in the request body. - In case of any errors, we are setting an appropriate error message using
setErrorfunction. - On successful login, we will be saving the token value to the user context.
We are not doing any client-side validation of username and password considering the scope of the post. I have written an article on how to do form validation in react.
Don't forget to add the environment variable REACT_APP_API_ENDPOINT to .env file and restart the client project.
It will have the server URL as its value:
1REACT_APP_API_ENDPOINT = http://localhost:8081/
If you are having multiple environments like dev, qa, stage, prod etc, and want to see how you can set multiple environment variables you can read this article.
Now if you click on login with valid credentials and log the userContext in Login.js to the console, you should be able to see the token:

Similarly, add the submit handler to the registration form:
1import { Button, Callout, FormGroup, InputGroup } from "@blueprintjs/core"2import React, { useContext, useState } from "react"3import { UserContext } from "./context/UserContext"45const Register = () => {6 const [isSubmitting, setIsSubmitting] = useState(false)7 const [error, setError] = useState("")8 const [firstName, setFirstName] = useState("")9 const [lastName, setLastName] = useState("")10 const [email, setEmail] = useState("")11 const [password, setPassword] = useState("")12 const [userContext, setUserContext] = useContext(UserContext)1314 const formSubmitHandler = e => {15 e.preventDefault()16 setIsSubmitting(true)17 setError("")1819 const genericErrorMessage = "Something went wrong! Please try again later."2021 fetch(process.env.REACT_APP_API_ENDPOINT + "users/signup", {22 method: "POST",23 credentials: "include",24 headers: { "Content-Type": "application/json" },25 body: JSON.stringify({ firstName, lastName, username: email, password }),26 })27 .then(async response => {28 setIsSubmitting(false)29 if (!response.ok) {30 if (response.status === 400) {31 setError("Please fill all the fields correctly!")32 } else if (response.status === 401) {33 setError("Invalid email and password combination.")34 } else if (response.status === 500) {35 console.log(response)36 const data = await response.json()37 if (data.message) setError(data.message || genericErrorMessage)38 } else {39 setError(genericErrorMessage)40 }41 } else {42 const data = await response.json()43 setUserContext(oldValues => {44 return { ...oldValues, token: data.token }45 })46 }47 })48 .catch(error => {49 setIsSubmitting(false)50 setError(genericErrorMessage)51 })52 }5354 return (55 <>56 {error && <Callout intent="danger">{error}</Callout>}5758 <form onSubmit={formSubmitHandler} className="auth-form">59 <FormGroup label="First Name" labelFor="firstName">60 <InputGroup61 id="firstName"62 placeholder="First Name"63 onChange={e => setFirstName(e.target.value)}64 value={firstName}65 />66 </FormGroup>67 <FormGroup label="Last Name" labelFor="firstName">68 <InputGroup69 id="lastName"70 placeholder="Last Name"71 onChange={e => setLastName(e.target.value)}72 value={lastName}73 />74 </FormGroup>75 <FormGroup label="Email" labelFor="email">76 <InputGroup77 id="email"78 type="email"79 placeholder="Email"80 onChange={e => setEmail(e.target.value)}81 value={email}82 />83 </FormGroup>84 <FormGroup label="Password" labelFor="password">85 <InputGroup86 id="password"87 placeholder="Password"88 type="password"89 onChange={e => setPassword(e.target.value)}90 value={password}91 />92 </FormGroup>93 <Button94 intent="primary"95 disabled={isSubmitting}96 text={`${isSubmitting ? "Registering" : "Register"}`}97 fill98 type="submit"99 />100 </form>101 </>102 )103}104105export default Register
Showing welcome screen
Now that we have the token stored in the context, we can determine whether to show the Login/Register form or the welcome screen.
First, let's create the welcome component:
1import React from "react"23const Welcome = () => {4 return <div>Welcome!</div>5}67export default Welcome
In the App.js let's check if userContext.token has any value,
if so then we will show the welcome screen otherwise we will show the Login/Register screen:
1import { Card, Tab, Tabs } from "@blueprintjs/core"2import { useContext, useState } from "react"3import { UserContext } from "./context/UserContext"4import Login from "./Login"5import Register from "./Register"6import Welcome from "./Welcome"78function App() {9 const [currentTab, setCurrentTab] = useState("login")10 const [userContext, setUserContext] = useContext(UserContext)1112 return !userContext.token ? (13 <Card elevation="1">14 <Tabs id="Tabs" onChange={setCurrentTab} selectedTabId={currentTab}>15 <Tab id="login" title="Login" panel={<Login />} />16 <Tab id="register" title="Register" panel={<Register />} />17 <Tabs.Expander />18 </Tabs>19 </Card>20 ) : (21 <Welcome />22 )23}2425export default App
Even though the login/registration works fine, each time we refresh the page, it will show the login screen. To handle this we will call the refresh token endpoint when the page loads and fetch the authentication token:
1import { Card, Tab, Tabs } from "@blueprintjs/core"2import { useCallback, useContext, useEffect, useState } from "react"3import { UserContext } from "./context/UserContext"4import Loader from "./Loader"5import Login from "./Login"6import Register from "./Register"7import Welcome from "./Welcome"89function App() {10 const [currentTab, setCurrentTab] = useState("login")11 const [userContext, setUserContext] = useContext(UserContext)1213 const verifyUser = useCallback(() => {14 fetch(process.env.REACT_APP_API_ENDPOINT + "users/refreshToken", {15 method: "POST",16 credentials: "include",17 headers: { "Content-Type": "application/json" },18 }).then(async response => {19 if (response.ok) {20 const data = await response.json()21 setUserContext(oldValues => {22 return { ...oldValues, token: data.token }23 })24 } else {25 setUserContext(oldValues => {26 return { ...oldValues, token: null }27 })28 }29 // call refreshToken every 5 minutes to renew the authentication token.30 setTimeout(verifyUser, 5 * 60 * 1000)31 })32 }, [setUserContext])3334 useEffect(() => {35 verifyUser()36 }, [verifyUser])3738 return userContext.token === null ? (39 <Card elevation="1">40 <Tabs id="Tabs" onChange={setCurrentTab} selectedTabId={currentTab}>41 <Tab id="login" title="Login" panel={<Login />} />42 <Tab id="register" title="Register" panel={<Register />} />43 <Tabs.Expander />44 </Tabs>45 </Card>46 ) : userContext.token ? (47 <Welcome />48 ) : (49 <Loader />50 )51}5253export default App
Here we have declared a function called verifyUser (enclosed within useCallback to avoid re-declaration when component re-renders),
which will be called on page load (with the help of useEffect) and will make a call to /refreshToken endpoint.
If it receives a success response, then it saves the token from the response body to the context.
If we receive, any error in refresh token call then we set the token to null in the context.
This means, whenever the user is not authenticated, the token will be set to null and we will show the Login screen.
When the refresh token call being made, we will display a spinner by including the Loader component.
Here is the code for the Loader.js:
1import { Spinner } from "@blueprintjs/core"2import React from "react"34const Loader = () => {5 return (6 <div className="loader">7 <Spinner size={50} />8 </div>9 )10}1112export default Loader
Let's also make sure that the spinner comes in the center by adding some styles:
1/* ... */2.loader {3 margin: 100px auto;4}
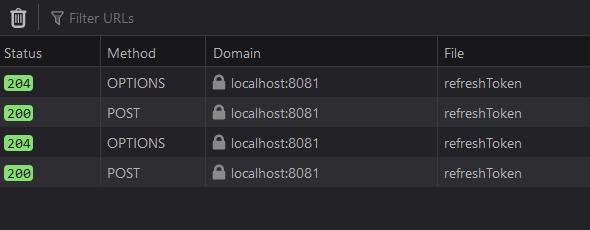
You will see that in App.js, we are calling verifyUser function every 5 minutes.
This is the silent refresh in action, used to renew the authentication token, which has an expiry time of 15 minutes.
Fetching the user details
Now that we have the login and refresh token in place, let's fetch the user details in the welcome screen:
1import { Button, Card } from "@blueprintjs/core"2import React, { useCallback, useContext, useEffect } from "react"3import { UserContext } from "./context/UserContext"4import Loader from "./Loader"56const Welcome = () => {7 const [userContext, setUserContext] = useContext(UserContext)89 const fetchUserDetails = useCallback(() => {10 fetch(process.env.REACT_APP_API_ENDPOINT + "users/me", {11 method: "GET",12 credentials: "include",13 // Pass authentication token as bearer token in header14 headers: {15 "Content-Type": "application/json",16 Authorization: `Bearer ${userContext.token}`,17 },18 }).then(async response => {19 if (response.ok) {20 const data = await response.json()21 setUserContext(oldValues => {22 return { ...oldValues, details: data }23 })24 } else {25 if (response.status === 401) {26 // Edge case: when the token has expired.27 // This could happen if the refreshToken calls have failed due to network error or28 // User has had the tab open from previous day and tries to click on the Fetch button29 window.location.reload()30 } else {31 setUserContext(oldValues => {32 return { ...oldValues, details: null }33 })34 }35 }36 })37 }, [setUserContext, userContext.token])3839 useEffect(() => {40 // fetch only when user details are not present41 if (!userContext.details) {42 fetchUserDetails()43 }44 }, [userContext.details, fetchUserDetails])4546 const refetchHandler = () => {47 // set details to undefined so that spinner will be displayed and48 // fetchUserDetails will be invoked from useEffect49 setUserContext(oldValues => {50 return { ...oldValues, details: undefined }51 })52 }5354 return userContext.details === null ? (55 "Error Loading User details"56 ) : !userContext.details ? (57 <Loader />58 ) : (59 <Card elevation="1">60 <div className="user-details">61 <div>62 <p>63 Welcome 64 <strong>65 {userContext.details.firstName}66 {userContext.details.lastName &&67 " " + userContext.details.lastName}68 </strong>!69 </p>70 <p>71 Your reward points: <strong>{userContext.details.points}</strong>72 </p>73 </div>74 <div className="user-actions">75 <Button text="Refetch" intent="primary" onClick={refetchHandler} />76 </div>77 </div>78 </Card>79 )80}8182export default Welcome
Here we have the fetchUserDetails, which will be called from the useEffect hook, whenever the userContext.details does not have any value.
In the fetchUserDetails function, we are calling the /users/me endpoint by passing the authentication token in the header.
The response of the call will be saved in userContext.details.
If there is any error in getting the response, then we set userContext.details to null, so that we can show some error message to the user.
When the user details are being fetched, we display the loader and
when details are successfully fetched, we display them to the user.
We also have a refetch button, when clicked will clear the user details from the user context,
which will trigger the useEffect hook to re-fetch the user details, and thus serving its purpose.
Logout functionality
Now that we are displaying the user details, let's add an option to logout:
1import { Button, Card } from "@blueprintjs/core"2import React, { useCallback, useContext, useEffect } from "react"3import { UserContext } from "./context/UserContext"4import Loader from "./Loader"56const Welcome = () => {7 const [userContext, setUserContext] = useContext(UserContext)89 const fetchUserDetails = useCallback(() => {10 fetch(process.env.REACT_APP_API_ENDPOINT + "users/me", {11 method: "GET",12 credentials: "include",13 // Pass authentication token as bearer token in header14 headers: {15 "Content-Type": "application/json",16 Authorization: `Bearer ${userContext.token}`,17 },18 }).then(async response => {19 if (response.ok) {20 const data = await response.json()21 setUserContext(oldValues => {22 return { ...oldValues, details: data }23 })24 } else {25 if (response.status === 401) {26 // Edge case: when the token has expired.27 // This could happen if the refreshToken calls have failed due to network error or28 // User has had the tab open from previous day and tries to click on the Fetch button29 window.location.reload()30 } else {31 setUserContext(oldValues => {32 return { ...oldValues, details: null }33 })34 }35 }36 })37 }, [setUserContext, userContext.token])3839 useEffect(() => {40 // fetch only when user details are not present41 if (!userContext.details) {42 fetchUserDetails()43 }44 }, [userContext.details, fetchUserDetails])4546 const logoutHandler = () => {47 fetch(process.env.REACT_APP_API_ENDPOINT + "users/logout", {48 credentials: "include",49 headers: {50 "Content-Type": "application/json",51 Authorization: `Bearer ${userContext.token}`,52 },53 }).then(async response => {54 setUserContext(oldValues => {55 return { ...oldValues, details: undefined, token: null }56 })57 window.localStorage.setItem("logout", Date.now())58 })59 }6061 const refetchHandler = () => {62 // set details to undefined so that spinner will be displayed and63 // fetchUserDetails will be invoked from useEffect64 setUserContext(oldValues => {65 return { ...oldValues, details: undefined }66 })67 }6869 return userContext.details === null ? (70 "Error Loading User details"71 ) : !userContext.details ? (72 <Loader />73 ) : (74 <Card elevation="1">75 <div className="user-details">76 <div>77 <p>78 Welcome 79 <strong>80 {userContext.details.firstName}81 {userContext.details.lastName &&82 " " + userContext.details.lastName}83 </strong>!84 </p>85 <p>86 Your reward points: <strong>{userContext.details.points}</strong>87 </p>88 </div>89 <div className="user-actions">90 <Button91 text="Logout"92 onClick={logoutHandler}93 minimal94 intent="primary"95 />96 <Button text="Refetch" intent="primary" onClick={refetchHandler} />97 </div>98 </div>99 </Card>100 )101}102103export default Welcome
When the logout button is clicked, we are calling logoutHandler function.
In logoutHandler we are calling /users/logout endpoint, so that the refresh token will be removed from the database and the cookie.
Finally, we are setting the user details and token in the context to null so that the login page will be displayed.
Also, we are saving the logout time to the local storage, which will be used in the next section for logging the user out from all the tabs.
Let's also add some styling to the welcome screen:
1/* ... */2.user-details {3 display: flex;4 justify-content: space-between;5}6.user-actions {7 display: flex;8 flex-direction: column;9}
Now the welcome screen should look like this:

Logging out from multiple tabs
If the user is logged in on multiple tabs, then we can log them out by adding an event listener to the local storage (we are saving the logout time to the local storage while logging out for this purpose).
1import { Card, Tab, Tabs } from "@blueprintjs/core"2import { useCallback, useContext, useEffect, useState } from "react"3import { UserContext } from "./context/UserContext"4import Loader from "./Loader"5import Login from "./Login"6import Register from "./Register"7import Welcome from "./Welcome"89function App() {10 const [currentTab, setCurrentTab] = useState("login")11 const [userContext, setUserContext] = useContext(UserContext)1213 const verifyUser = useCallback(() => {14 fetch(process.env.REACT_APP_API_ENDPOINT + "users/refreshToken", {15 method: "POST",16 credentials: "include",17 headers: { "Content-Type": "application/json" },18 }).then(async response => {19 if (response.ok) {20 const data = await response.json()21 setUserContext(oldValues => {22 return { ...oldValues, token: data.token }23 })24 } else {25 setUserContext(oldValues => {26 return { ...oldValues, token: null }27 })28 }29 // call refreshToken every 5 minutes to renew the authentication token.30 setTimeout(verifyUser, 5 * 60 * 1000)31 })32 }, [setUserContext])3334 useEffect(() => {35 verifyUser()36 }, [verifyUser])3738 /**39 * Sync logout across tabs40 */41 const syncLogout = useCallback(event => {42 if (event.key === "logout") {43 // If using react-router-dom, you may call history.push("/")44 window.location.reload()45 }46 }, [])4748 useEffect(() => {49 window.addEventListener("storage", syncLogout)50 return () => {51 window.removeEventListener("storage", syncLogout)52 }53 }, [syncLogout])5455 return userContext.token === null ? (56 <Card elevation="1">57 <Tabs id="Tabs" onChange={setCurrentTab} selectedTabId={currentTab}>58 <Tab id="login" title="Login" panel={<Login />} />59 <Tab id="register" title="Register" panel={<Register />} />60 <Tabs.Expander />61 </Tabs>62 </Card>63 ) : userContext.token ? (64 <Welcome />65 ) : (66 <Loader />67 )68}6970export default App
So whenever you click on the logout button in one tab, all the other tabs reload and since the refresh token is deleted from the cookie, the refresh token call fails and the login page is displayed.
Source code and Demo
You can view the complete source code of the client here, the server here, and a demo here.
If you have liked article, do follow me on twitter to get more real time updates!
Comments