
Table of Contents
You might come across many websites where a file needs to be uploaded, like uploading a profile picture while creating a profile. If the user has a slow network or uploads a huge file, then they might need to wait for a longer period of time after clicking on the upload button. In such cases, it is good to show feedback to the user such as a progress bar, rather than having the user stare at the screen and wondering what is happening.
In this tutorial, we will see how can we achieve file upload in React and Express/Node backend with help of the multer node library.
Creating the React Project
First, create a folder named react-upload-file-progress-bar and create 2 directories client and server inside it.
Navigate to the client directory and run the following command to create the client project:
1npx create-react-app .
Creating the upload form
We will be making use of react-bootstrap to style the page and display the progress bar. So let's install it inside the client project.
1yarn add bootstrap react-bootstrap
Import the bootstrap css in index.js:
1import React from "react"2import ReactDOM from "react-dom"3import App from "./App"4import "bootstrap/dist/css/bootstrap.min.css"56ReactDOM.render(7 <React.StrictMode>8 <App />9 </React.StrictMode>,10 document.getElementById("root")11)
Now add the following code to App.js
1import { Container, Row, Col, Form, Button } from "react-bootstrap"23function App() {4 return (5 <Container>6 <Row>7 <Col lg={{ span: 4, offset: 3 }}>8 <Form9 action="http://localhost:8081/upload_file"10 method="post"11 encType="multipart/form-data"12 >13 <Form.Group>14 <Form.File15 id="exampleFormControlFile1"16 label="Select a File"17 name="file"18 />19 </Form.Group>20 <Form.Group>21 <Button variant="info" type="submit">22 Upload23 </Button>24 </Form.Group>25 </Form>26 </Col>27 </Row>28 </Container>29 )30}3132export default App
In the above code, we have created a form with file input and an upload button. We have styled the form using bootstrap components.
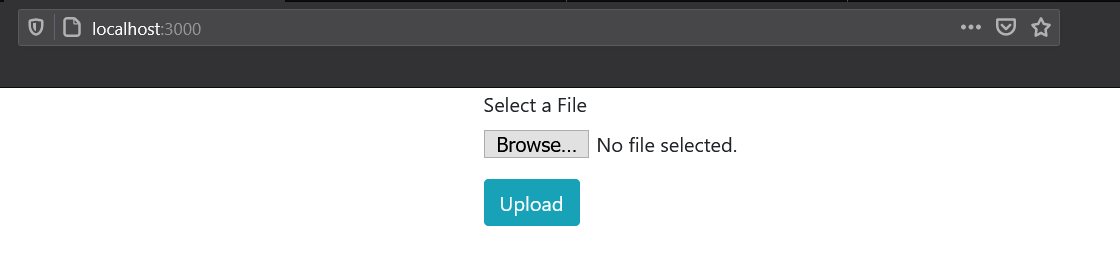
Now if you start the application and open http://localhost:3000 in your browser, you would see a page as shown below:
Binding the form with backend API
We will be making use of Axios to make API calls (upload file in our case). So let's go ahead and install it:
1yarn add axios
Inside the src directory, create a subfolder named utils and create a file named axios.js with the following contents:
1import axios from "axios"2const axiosInstance = axios.create({3 baseURL: "http://localhost:8081/",4})5export default axiosInstance
This creates an instance of Axios and this instance can be reused wherever required and it helps in avoiding the need to mention the base URL everywhere.
localhost:8081 is the endpoint where we will be building the Node/Express server later in this tutorial.
Now let's write a handler to upload the file when the form is submitted:
1const [selectedFiles, setSelectedFiles] = useState()2const [progress, setProgress] = useState()34const submitHandler = e => {5 e.preventDefault() //prevent the form from submitting6 let formData = new FormData()78 formData.append("file", selectedFiles[0])9 axiosInstance.post("/upload_file", formData, {10 headers: {11 "Content-Type": "multipart/form-data",12 },13 onUploadProgress: data => {14 //Set the progress value to show the progress bar15 setProgress(Math.round((100 * data.loaded) / data.total))16 },17 })18}
Here we are making use of 2 local states, one to hold the uploaded file details and another to hold the upload progress percentage.
Also, make sure that you are adding the content-type header as multipart/form-data, so that it works similar to normal form submit
and multer will be able to parse the file in the back end.
Axios also accepts optional
onUploadProgressproperty, which is a callback with details about how much data is uploaded.
Now let's bind the submit handler and the input field:
1import { useState } from "react"2import { Container, Row, Col, Form, Button, ProgressBar } from "react-bootstrap"3import axiosInstance from "./utils/axios"45function App() {6 const [selectedFiles, setSelectedFiles] = useState([])7 const [progress, setProgress] = useState()89 const submitHandler = e => {10 e.preventDefault() //prevent the form from submitting11 let formData = new FormData()1213 formData.append("file", selectedFiles[0])14 axiosInstance.post("/upload_file", formData, {15 headers: {16 "Content-Type": "multipart/form-data",17 },18 onUploadProgress: data => {19 //Set the progress value to show the progress bar20 setProgress(Math.round((100 * data.loaded) / data.total))21 },22 })23 }24 return (25 <Container>26 <Row>27 <Col lg={{ span: 4, offset: 3 }}>28 <Form29 action="http://localhost:8081/upload_file"30 method="post"31 encType="multipart/form-data"32 onSubmit={submitHandler}33 >34 <Form.Group>35 <Form.File36 id="exampleFormControlFile1"37 label="Select a File"38 name="file"39 onChange={e => {40 setSelectedFiles(e.target.files)41 }}42 />43 </Form.Group>44 <Form.Group>45 <Button variant="info" type="submit">46 Upload47 </Button>48 </Form.Group>49 {progress && <ProgressBar now={progress} label={`${progress}%`} />}50 </Form>51 </Col>52 </Row>53 </Container>54 )55}5657export default App
Also, we are showing the progress bar whenever it has some value using the ProgressBar component from react-bootstrap.
Creating the backend Node Project
Now we have the client-side ready, let's build the server-side. Inside the server folder run the following command to create a node project.
1npm init -y
Update the package.json that is created with the following start script:
1{2 "name": "server",3 "version": "1.0.0",4 "description": "",5 "main": "index.js",6 "scripts": {7 "test": "echo \"Error: no test specified\" && exit 1",8 "start": "node index.js"9 },10 "keywords": [],11 "author": "",12 "license": "ISC"13}
Now we need to have the following modules added to our project:
- express - Used to create a web framework with node.js
- multer - A node.js middleware for handling
multipart/form-data, which is primarily used for uploading files - cors - Enabling CORS policies for the client URL.
Run the following command to install the above packages in the server project:
1yarn add express multer cors
Now create a file named upload.js inside the server project with the following code:
1const multer = require("multer")2const storage = multer.diskStorage({3 //Specify the destination directory where the file needs to be saved4 destination: function (req, file, cb) {5 cb(null, "./uploads")6 },7 //Specify the name of the file. The date is prefixed to avoid overwriting of files.8 filename: function (req, file, cb) {9 cb(null, Date.now() + "_" + file.originalname)10 },11})1213const upload = multer({14 storage: storage,15})1617module.exports = upload
Here we are creating the multer instance, by specifying the destination and the file name in which the uploaded file needs to be saved.
Now create a file named index.js with the following code:
1const express = require("express")2const upload = require("./upload")3const multer = require("multer")4const cors = require("cors")56const app = express()78//Add the client URL to the CORS policy9const whitelist = ["http://localhost:3000"]10const corsOptions = {11 origin: function (origin, callback) {12 if (!origin || whitelist.indexOf(origin) !== -1) {13 callback(null, true)14 } else {15 callback(new Error("Not allowed by CORS"))16 }17 },18 credentials: true,19}20app.use(cors(corsOptions))2122app.post("/upload_file", upload.single("file"), function (req, res) {23 if (!req.file) {24 //If the file is not uploaded, then throw custom error with message: FILE_MISSING25 throw Error("FILE_MISSING")26 } else {27 //If the file is uploaded, then send a success response.28 res.send({ status: "success" })29 }30})3132//Express Error Handling33app.use(function (err, req, res, next) {34 // Check if the error is thrown from multer35 if (err instanceof multer.MulterError) {36 res.statusCode = 40037 res.send({ code: err.code })38 } else if (err) {39 // If it is not multer error then check if it is our custom error for FILE_MISSING40 if (err.message === "FILE_MISSING") {41 res.statusCode = 40042 res.send({ code: "FILE_MISSING" })43 } else {44 //For any other errors set code as GENERIC_ERROR45 res.statusCode = 50046 res.send({ code: "GENERIC_ERROR" })47 }48 }49})5051//Start the server in port 808152const server = app.listen(8081, function () {53 const port = server.address().port5455 console.log("App started at http://localhost:%s", port)56})
In the above code,
- We have created a POST route at
/upload_fileand call upload function exported fromupload.js. The namefilepassed inside theupload.single()function should match with that ofFormDatain the axios call written before. - We have added the CORS policy for out client URL. This code snippet can be reused in any express project which requires to handle CORS.
- Multer will add the details of the file uploaded to
req.file. So ifreq.filedoes not have any data, that means the file is not uploaded. Multer by default does not throw any error if the file is missing. So we are throwing an express error with a messageFILE_MISSING - We have an error handler for express which looks for both Multer errors and express errors and we pass the appropriate error code in the response.
Before running the application, let's create the directory uploads where the uploaded files will be saved.
Now if you run the application, using the command npm start in 2 separate terminals,
one inside the client and another inside the server directory, you will see the progress bar in action:
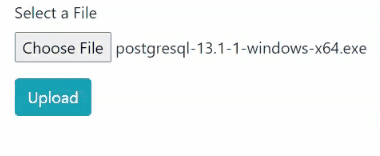
I have used a huge file (200MB) to upload, since uploading to localhost is pretty fast and we will not be able to see the progress bar correctly. You can make use of the network throttling feature of the browser as well.
If you check the uploads directory now, you should be able to see the file there:

Error handling
Now let's show appropriate error messages when the upload has failed.
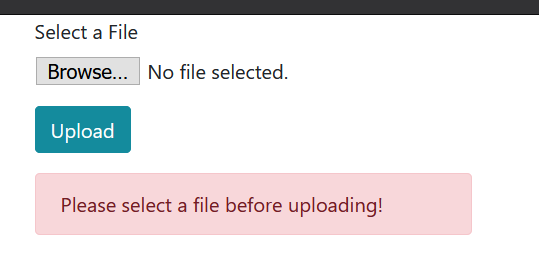
When the file is not uploaded
If the user has failed to select a file before clicking upload, we need to inform the user.
For that, let's update App.js with a catch chain for the axios call:
1import { useState } from "react"2import {3 Container,4 Row,5 Col,6 Form,7 Button,8 ProgressBar,9 Alert,10} from "react-bootstrap"11import axiosInstance from "./utils/axios"1213function App() {14 const [selectedFiles, setSelectedFiles] = useState([])15 const [progress, setProgress] = useState()16 const [error, setError] = useState()1718 const submitHandler = e => {19 e.preventDefault() //prevent the form from submitting20 let formData = new FormData()2122 formData.append("file", selectedFiles[0])23 //Clear the error message24 setError("")25 axiosInstance26 .post("/upload_file", formData, {27 headers: {28 "Content-Type": "multipart/form-data",29 },30 onUploadProgress: data => {31 //Set the progress value to show the progress bar32 setProgress(Math.round((100 * data.loaded) / data.total))33 },34 })35 .catch(error => {36 const { code } = error?.response?.data37 switch (code) {38 case "FILE_MISSING":39 setError("Please select a file before uploading!")40 break41 default:42 setError("Sorry! Something went wrong. Please try again later")43 break44 }45 })46 }47 return (48 <Container>49 <Row>50 <Col lg={{ span: 4, offset: 3 }}>51 <Form52 action="http://localhost:8081/upload_file"53 method="post"54 encType="multipart/form-data"55 onSubmit={submitHandler}56 >57 <Form.Group>58 <Form.File59 id="exampleFormControlFile1"60 label="Select a File"61 name="file"62 onChange={e => {63 setSelectedFiles(e.target.files)64 }}65 />66 </Form.Group>67 <Form.Group>68 <Button variant="info" type="submit">69 Upload70 </Button>71 </Form.Group>72 {error && <Alert variant="danger">{error}</Alert>}73 {!error && progress && (74 <ProgressBar now={progress} label={`${progress}%`} />75 )}76 </Form>77 </Col>78 </Row>79 </Container>80 )81}8283export default App
In the above code, whenever an error occurs we are setting the error message to the error state and displaying using the
Alert component
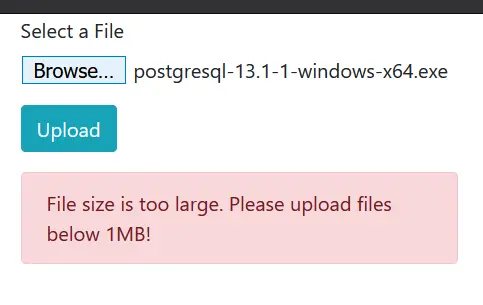
Preventing huge file uploads
When we need to restrict the size of the file uploaded, we can add that configuration in upload.js in the server project:
1const multer = require("multer")2const storage = multer.diskStorage({3 //Specify the destination directory where the file needs to be saved4 destination: function (req, file, cb) {5 cb(null, "./uploads")6 },7 //Specify the name of the file. The date is prefixed to avoid overwriting of files.8 filename: function (req, file, cb) {9 cb(null, Date.now() + "_" + file.originalname)10 },11})1213const upload = multer({14 storage: storage,15 limits: {16 fileSize: 1024 * 1024,17 },18})1920module.exports = upload
Now let's update our switch case in App.js in client side:
1switch (code) {2 case "FILE_MISSING":3 setError("Please select a file before uploading!")4 break5 case "LIMIT_FILE_SIZE":6 setError("File size is too large. Please upload files below 1MB!")7 break89 default:10 setError("Sorry! Something went wrong. Please try again later")11 break12}
Now if you try to upload a file larger than 1 MB, you should see the error message:
Restricting file types
When we need to allow only certain type of files, we can add a fileFilter to the multer configuration as shown below:
1const upload = multer({2 storage: storage,3 limits: {4 fileSize: 1024 * 1024,5 },6 fileFilter: (req, file, cb) => {7 if (8 file.mimetype == "image/png" ||9 file.mimetype == "image/jpg" ||10 file.mimetype == "image/jpeg"11 ) {12 cb(null, true)13 } else {14 cb(null, false)15 return cb(new Error("INVALID_TYPE"))16 }17 },18})
Also, let's tweak the error handler in index.js to accommodate the new error code:
1// ...2//Express Error Handling3app.use(function (err, req, res, next) {4 // Check if the error is thrown from multer5 if (err instanceof multer.MulterError) {6 res.statusCode = 4007 res.send({ code: err.code })8 } else if (err) {9 // If it is not multer error then check if it is our custom error for FILE_MISSING & INVALID_TYPE10 if (err.message === "FILE_MISSING" || err.message === "INVALID_TYPE") {11 res.statusCode = 40012 res.send({ code: err.message })13 } else {14 //For any other errors set code as GENERIC_ERROR15 res.statusCode = 50016 res.send({ code: "GENERIC_ERROR" })17 }18 }19})2021// ...
Finally, add a new case to the switch condition in App.js:
1switch (code) {2 case "FILE_MISSING":3 setError("Please select a file before uploading!")4 break5 case "LIMIT_FILE_SIZE":6 setError("File size is too large. Please upload files below 1MB!")7 break8 case "INVALID_TYPE":9 setError(10 "This file type is not supported! Only .png, .jpg and .jpeg files are allowed"11 )12 break1314 default:15 setError("Sorry! Something went wrong. Please try again later")16 break17}
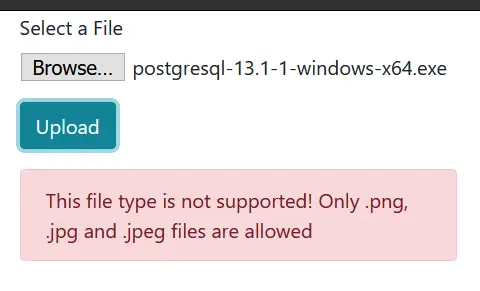
Now upload a file that is not an image and see if it shows the error:
Source code
You can view the complete source code here.
If you have liked article, do follow me on twitter to get more real time updates!
Comments