
Table of Contents
In one of my previous articles, I have explained how to fetch and display data from API in React. In this article, we will see how to use Axios for calling APIs.
Project setup
We will be displaying a list of persons and their job titles in this application. Users will have options to add a new record, update a record and delete a record.
Mock API server
We will be configuring a json-server, which will help us to build a mock API, which can be called using Axios.
First, install json-server globally (if you haven't already):
1npm i -g json-server
Now create a file named persons.json with the following data:
1{"persons":[{"id":"4e03b8f4-b8b2-4af5-92d5-cf224a383c8c","name":"Lauren Gleason","jobTitle":"Direct Branding Representative"},{"id":"bd2d3b33-1d55-47d4-9ed5-4e42c13d9260","name":"Jill Watsica","jobTitle":"Legacy Factors Officer"},{"id":"a6075a16-239e-4f75-a662-3b45e6b6f840","name":"Drew Kovacek","jobTitle":"Senior Applications Developer"},{"id":"3ffb24ad-4f33-451c-a833-f46b7e43013a","name":"Gabriel Buckridge","jobTitle":"Regional Tactics Facilitator"},{"id":"4e5e69bf-dd47-425f-9c2e-5d20e64cf622","name":"Glen Moen","jobTitle":"Human Operations Officer"},{"id":"41ab6ee0-fa2c-4fa5-8f0b-6bde7e8d3312","name":"Mrs. Bonnie Wolff","jobTitle":"Dynamic Directives Consultant"},{"id":"bbe9b920-75c3-4e7d-8ebb-eed49c3301f9","name":"Ron Marquardt","jobTitle":"Dynamic Usability Producer"},{"id":"ecbcb95d-288d-403f-934b-f9012958646c","name":"Jan Vandervort","jobTitle":"District Infrastructure Director"},{"id":"f5e18689-c923-428c-b3fd-10db9763d7ab","name":"Julius Lynch","jobTitle":"International Branding Planner"},{"id":"d523f6bd-3c31-4c81-a33c-8f25028309e7","name":"Walter Dibbert","jobTitle":"Central Factors Planner"}]}
Now run the following command to start the API:
1json-server persons.json -p 8001
Once the server is started, you will be able to see the API response in http://localhost:8001/persons
Here, persons.json acts as a data store and we will be able to create a new record,
update an existing record, and delete a record using json-server.
React setup
Create a React project by running the following command:
1npx create-react-app react-axios
Now install the following packages:
1npm i axios @blueprintjs/core uuid
- Axios - used to make API calls.
- BluePrintJS - toolkit for UI components
- uuid- For creating a unique id while adding a new record.
Update index.css with the following styles:
1@import "~normalize.css";2@import "~@blueprintjs/core/lib/css/blueprint.css";3@import "~@blueprintjs/icons/lib/css/blueprint-icons.css";4body {5 margin-top: 10px;6}7.App {8 display: flex;9 justify-content: center;10}11.spinner {12 height: 100vh;13 display: flex;14 align-items: center;15}
Here we are including the BluePrintJS styles and some custom styling.
Fetching the data
In the App.js, we will fetch and display the name and job title:
1import { Card } from "@blueprintjs/core"2import axios from "axios"3import { useEffect, useState } from "react"45function App() {6 const [persons, setPersons] = useState([])7 useEffect(() => {8 axios.get("http://localhost:8001/persons").then(response => {9 setPersons(response.data)10 })11 }, [])1213 return (14 <div className="App">15 <Card>16 <table className="bp3-html-table .modifier">17 <thead>18 <tr>19 <th>Name</th>20 <th>Job Title</th>21 </tr>22 </thead>23 <tbody>24 {persons.map(person => {25 return (26 <tr key={person.id}>27 <td>{person.name}</td>28 <td>{person.jobTitle}</td>29 </tr>30 )31 })}32 </tbody>33 </table>34 </Card>35 </div>36 )37}3839export default App
As highlighted above, we can call axios.get() to make GET calls and response.data will contain the response body in JSON format.
If you run the application now and load it, you will see the table populated with person details:

Updating the data
We can use the following code to update the record:
1import {2 Card,3 Button,4 EditableText,5 Toaster,6 Position,7} from "@blueprintjs/core"8import axios from "axios"9import { useEffect, useState } from "react"1011const AppToaster = Toaster.create({12 position: Position.TOP,13})1415function App() {16 const [persons, setPersons] = useState([])17 useEffect(() => {18 axios.get("http://localhost:8001/persons").then(response => {19 setPersons(response.data)20 })21 }, [])2223 const onChangeHandler = (id, key, value) => {24 setPersons(values => {25 return values.map(item =>26 item.id === id ? { ...item, [key]: value } : item27 )28 })29 }3031 const updateData = id => {32 const data = persons.find(item => item.id === id)33 axios.put(`http://localhost:8001/persons/${id}`, data).then(response => {34 AppToaster.show({35 message: "Data updated successfully",36 intent: "success",37 timeout: 3000,38 })39 })40 }4142 return (43 <div className="App">44 <Card>45 <table className="bp3-html-table .modifier">46 <thead>47 <tr>48 <th>Name</th>49 <th>Job Title</th>50 <th>Actions</th>51 </tr>52 </thead>53 <tbody>54 {persons.map(person => {55 return (56 <tr key={person.id}>57 <td>58 <EditableText59 value={person.name}60 onChange={value =>61 onChangeHandler(person.id, "name", value)62 }63 />64 </td>65 <td>66 <EditableText67 value={person.jobTitle}68 onChange={value =>69 onChangeHandler(person.id, "jobTitle", value)70 }71 />72 </td>73 <td>74 <Button75 intent="primary"76 onClick={() => updateData(person.id)}77 >78 Update79 </Button>80 </td>81 </tr>82 )83 })}84 </tbody>85 </table>86 </Card>87 </div>88 )89}9091export default App
In the above code,
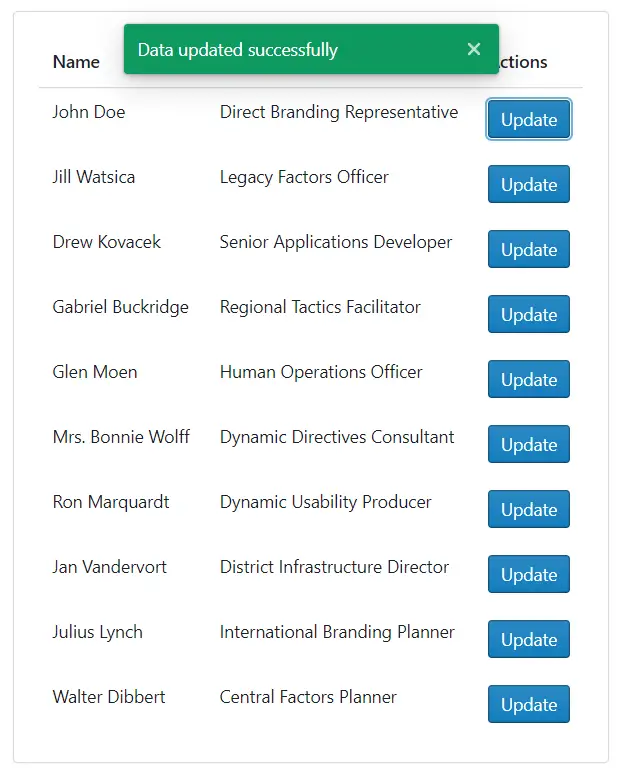
- We have added a column called Actions to the table and an update button against each record.
- We are using EditableText from BluePrintJS to make the text editable when hovered.
- We have written an
onChangeHandlerfunction, which will be called when the user updates the data, and it will be saved to the local state calledpersons. If you are new to React, then you can read about how to use useState hook to store and update arrays. - When the update button is clicked, we are calling
updateData, which calls theaxios.put()function to make a PUT request call, to update the particular record. - In the
.then()block, we are usingToasterto display a toast message to the user indicating that the record has been updated.
If you run the application now, change the info and click on update, it should get updated and a toast message should be shown:
Deleting the data
Now we will see how to delete an individual record. We can make use of axios.delete() function for the same.
1import {2 Card,3 Button,4 EditableText,5 Toaster,6 Position,7} from "@blueprintjs/core"8import axios from "axios"9import { useEffect, useState } from "react"1011const AppToaster = Toaster.create({12 position: Position.TOP,13})1415function App() {16 const [persons, setPersons] = useState([])17 useEffect(() => {18 axios.get("http://localhost:8001/persons").then(response => {19 setPersons(response.data)20 })21 }, [])2223 const onChangeHandler = (id, key, value) => {24 setPersons(values => {25 return values.map(item =>26 item.id === id ? { ...item, [key]: value } : item27 )28 })29 }3031 const updateData = id => {32 const data = persons.find(item => item.id === id)33 axios.put(`http://localhost:8001/persons/${id}`, data).then(response => {34 AppToaster.show({35 message: "Data updated successfully",36 intent: "success",37 timeout: 3000,38 })39 })40 }4142 const deleteData = id => {43 axios.delete(`http://localhost:8001/persons/${id}`).then(response => {44 setPersons(values => {45 return values.filter(item => item.id !== id)46 })4748 AppToaster.show({49 message: "Data deleted successfully",50 intent: "success",51 timeout: 3000,52 })53 })54 }5556 return (57 <div className="App">58 <Card>59 <table className="bp3-html-table .modifier">60 <thead>61 <tr>62 <th>Name</th>63 <th>Job Title</th>64 <th>Actions</th>65 </tr>66 </thead>67 <tbody>68 {persons.map(person => {69 return (70 <tr key={person.id}>71 <td>72 <EditableText73 value={person.name}74 onChange={value =>75 onChangeHandler(person.id, "name", value)76 }77 />78 </td>79 <td>80 <EditableText81 value={person.jobTitle}82 onChange={value =>83 onChangeHandler(person.id, "jobTitle", value)84 }85 />86 </td>87 <td>88 <Button89 intent="primary"90 onClick={() => updateData(person.id)}91 >92 Update93 </Button>94 95 <Button96 intent="danger"97 onClick={() => deleteData(person.id)}98 >99 Delete100 </Button>101 </td>102 </tr>103 )104 })}105 </tbody>106 </table>107 </Card>108 </div>109 )110}111112export default App
Creating a new record
In this section, we will see how to add a new record:
1import {2 Card,3 Button,4 EditableText,5 Toaster,6 Position,7 InputGroup,8} from "@blueprintjs/core"9import axios from "axios"10import { useEffect, useState } from "react"11import { v4 as uuidv4 } from "uuid"1213const AppToaster = Toaster.create({14 position: Position.TOP,15})1617function App() {18 const [persons, setPersons] = useState([])19 const [newName, setNewName] = useState()20 const [newJobTitle, setNewJobTitle] = useState()21 useEffect(() => {22 axios.get("http://localhost:8001/persons").then(response => {23 setPersons(response.data)24 })25 }, [])2627 const onChangeHandler = (id, key, value) => {28 setPersons(values => {29 return values.map(item =>30 item.id === id ? { ...item, [key]: value } : item31 )32 })33 }3435 const updateData = id => {36 const data = persons.find(item => item.id === id)37 axios.put(`http://localhost:8001/persons/${id}`, data).then(response => {38 AppToaster.show({39 message: "Data updated successfully",40 intent: "success",41 timeout: 3000,42 })43 })44 }4546 const deleteData = id => {47 axios.delete(`http://localhost:8001/persons/${id}`).then(response => {48 setPersons(values => {49 return values.filter(item => item.id !== id)50 })5152 AppToaster.show({53 message: "Data deleted successfully",54 intent: "success",55 timeout: 3000,56 })57 })58 }5960 const addPerson = () => {61 if (newName?.trim() && newJobTitle?.trim()) {62 axios63 .post("http://localhost:8001/persons", {64 id: uuidv4(),65 name: newName.trim(),66 jobTitle: newJobTitle.trim(),67 })68 .then(response => {69 setPersons([...persons, response.data])70 setNewName("")71 setNewJobTitle("")72 })73 }74 }7576 return (77 <div className="App">78 <Card>79 <table className="bp3-html-table .modifier">80 <thead>81 <tr>82 <th>Name</th>83 <th>Job Title</th>84 <th>Actions</th>85 </tr>86 </thead>87 <tbody>88 {persons.map(person => {89 return (90 <tr key={person.id}>91 <td>92 <EditableText93 value={person.name}94 onChange={value =>95 onChangeHandler(person.id, "name", value)96 }97 />98 </td>99 <td>100 <EditableText101 value={person.jobTitle}102 onChange={value =>103 onChangeHandler(person.id, "jobTitle", value)104 }105 />106 </td>107 <td>108 <Button109 intent="primary"110 onClick={() => updateData(person.id)}111 >112 Update113 </Button>114 115 <Button116 intent="danger"117 onClick={() => deleteData(person.id)}118 >119 Delete120 </Button>121 </td>122 </tr>123 )124 })}125 </tbody>126 <tfoot>127 <tr>128 <td>129 <InputGroup130 placeholder="Add name here..."131 value={newName}132 onChange={e => setNewName(e.target.value)}133 />134 </td>135 <td>136 <InputGroup137 placeholder="Add job title here..."138 value={newJobTitle}139 onChange={e => setNewJobTitle(e.target.value)}140 />141 </td>142 <td>143 <Button intent="success" onClick={() => addPerson()}>144 Add Person145 </Button>146 </td>147 </tr>148 </tfoot>149 </table>150 </Card>151 </div>152 )153}154155export default App
In the above code,
- We have 2 local states,
newNameandnewJobTitleto store the new record values, and we have added 2 input boxes to accept these values from the user. - We have a button named Add Person, when clicked, calls
addPersonfunction. InaddPerson, we are generating a unique id for the new record and callingaxios.postfor adding the record. - Once the record is created, we are updating the record to the local state and clearing the input fields.
Adding a loader
As you may have observed, when we load the page, the data will not be present initially and then it will load, creating a jumping effect. To avoid this, let's add a loader when the data is being loaded.
1import {2 Card,3 Button,4 EditableText,5 Toaster,6 Position,7 InputGroup,8 Spinner,9} from "@blueprintjs/core"10import axios from "axios"11import { useEffect, useState } from "react"12import { v4 as uuidv4 } from "uuid"1314const AppToaster = Toaster.create({15 position: Position.TOP,16})1718function App() {19 const [persons, setPersons] = useState([])20 const [newName, setNewName] = useState()21 const [loading, setLoading] = useState(false)22 const [newJobTitle, setNewJobTitle] = useState()23 useEffect(() => {24 setLoading(true)25 axios26 .get("http://localhost:8001/persons")27 .then(response => {28 setPersons(response.data)29 })30 .finally(() => {31 setLoading(false)32 })33 }, [])3435 const onChangeHandler = (id, key, value) => {36 setPersons(values => {37 return values.map(item =>38 item.id === id ? { ...item, [key]: value } : item39 )40 })41 }4243 const updateData = id => {44 const data = persons.find(item => item.id === id)45 axios.put(`http://localhost:8001/persons/${id}`, data).then(response => {46 AppToaster.show({47 message: "Data updated successfully",48 intent: "success",49 timeout: 3000,50 })51 })52 }5354 const deleteData = id => {55 axios.delete(`http://localhost:8001/persons/${id}`).then(response => {56 setPersons(values => {57 return values.filter(item => item.id !== id)58 })5960 AppToaster.show({61 message: "Data deleted successfully",62 intent: "success",63 timeout: 3000,64 })65 })66 }6768 const addPerson = () => {69 if (newName?.trim() && newJobTitle?.trim()) {70 axios71 .post("http://localhost:8001/persons", {72 id: uuidv4(),73 name: newName.trim(),74 jobTitle: newJobTitle.trim(),75 })76 .then(response => {77 setPersons([...persons, response.data])78 setNewName("")79 setNewJobTitle("")80 })81 }82 }8384 return (85 <div className="App">86 {loading ? (87 <div className="spinner">88 <Spinner />89 </div>90 ) : (91 <Card>92 <table className="bp3-html-table .modifier">93 <thead>94 <tr>95 <th>Name</th>96 <th>Job Title</th>97 <th>Actions</th>98 </tr>99 </thead>100 <tbody>101 {persons.map(person => {102 return (103 <tr key={person.id}>104 <td>105 <EditableText106 value={person.name}107 onChange={value =>108 onChangeHandler(person.id, "name", value)109 }110 />111 </td>112 <td>113 <EditableText114 value={person.jobTitle}115 onChange={value =>116 onChangeHandler(person.id, "jobTitle", value)117 }118 />119 </td>120 <td>121 <Button122 intent="primary"123 onClick={() => updateData(person.id)}124 >125 Update126 </Button>127 128 <Button129 intent="danger"130 onClick={() => deleteData(person.id)}131 >132 Delete133 </Button>134 </td>135 </tr>136 )137 })}138 </tbody>139 <tfoot>140 <tr>141 <td>142 <InputGroup143 placeholder="Add name here..."144 value={newName}145 onChange={e => setNewName(e.target.value)}146 />147 </td>148 <td>149 <InputGroup150 placeholder="Add job title here..."151 value={newJobTitle}152 onChange={e => setNewJobTitle(e.target.value)}153 />154 </td>155 <td>156 <Button intent="success" onClick={() => addPerson()}>157 Add Person158 </Button>159 </td>160 </tr>161 </tfoot>162 </table>163 </Card>164 )}165 </div>166 )167}168169export default App
Error handling
In case the API is down, or we have provided an incorrect URL, then we can show an error message to the user:
1useEffect(() => {2 setLoading(true)3 axios4 .get("http://localhost:8001/personss")5 .then(response => {6 setPersons(response.data)7 })8 .catch(error => {9 console.log({ response: error.response })10 AppToaster.show({11 message: "Unable to load data, Something went wrong!",12 intent: "danger",13 timeout: 3000,14 })15 })16 .finally(() => {17 setLoading(false)18 })19}, [])
If you update the above code and run the application, you will be able to see the following error toast:

If you open the browser console, you will see that the response contains information like status and status text. Based on these parameters, you can display more meaningful error messages as well.

Async await syntax
So far in this article, we hav been using .then() syntax to resolve the Axios call.
We can use the async-await syntax as well:
1useEffect(() => {2 const fetchData = async () => {3 setLoading(true)4 try {5 const response = await axios.get("http://localhost:8001/persons")6 setPersons(response.data)7 } catch (error) {8 console.log({ error })9 AppToaster.show({10 message: "Unable to load data, Something went wrong!",11 intent: "danger",12 timeout: 3000,13 })14 } finally {15 setLoading(false)16 }17 }18 fetchData()19}, [])
We have written a new function fetchData since useEffect function needs to be synchronous.
You can read more about it here.
Axios instance configuration
Since we are using the same endpoint in multiple places, we can create an instance of axios and pass the URL configuration to it and use the created instance to make API calls.
Create a file named config.js with the following content:
1import axios from "axios"23export const AxiosInstance = axios.create({4 baseURL: "http://localhost:8001/persons/",5 // timeout: 1000,6 // headers: { "X-Custom-Header": "foobar" },7})
As you can see, apart from giving the URL, we can provide other parameters like timeout, custom headers as well.
We can use them in the App.js:
1import {2 Card,3 Button,4 EditableText,5 Toaster,6 Position,7 InputGroup,8 Spinner,9} from "@blueprintjs/core"10import { useEffect, useState } from "react"11import { v4 as uuidv4 } from "uuid"12import { AxiosInstance } from "./config"1314const AppToaster = Toaster.create({15 position: Position.TOP,16})1718function App() {19 const [persons, setPersons] = useState([])20 const [newName, setNewName] = useState()21 const [loading, setLoading] = useState(false)22 const [newJobTitle, setNewJobTitle] = useState()23 useEffect(() => {24 const fetchData = async () => {25 setLoading(true)26 try {27 const response = await AxiosInstance.get()28 setPersons(response.data)29 } catch (error) {30 console.log({ error })31 AppToaster.show({32 message: "Unable to load data, Something went wrong!",33 intent: "danger",34 timeout: 3000,35 })36 } finally {37 setLoading(false)38 }39 }40 fetchData()41 }, [])4243 const onChangeHandler = (id, key, value) => {44 setPersons(values => {45 return values.map(item =>46 item.id === id ? { ...item, [key]: value } : item47 )48 })49 }5051 const updateData = id => {52 const data = persons.find(item => item.id === id)53 AxiosInstance.put(`${id}`, data).then(response => {54 AppToaster.show({55 message: "Data updated successfully",56 intent: "success",57 timeout: 3000,58 })59 })60 }6162 const deleteData = id => {63 AxiosInstance.delete(`${id}`).then(response => {64 setPersons(values => {65 return values.filter(item => item.id !== id)66 })6768 AppToaster.show({69 message: "Data deleted successfully",70 intent: "success",71 timeout: 3000,72 })73 })74 }7576 const addPerson = () => {77 if (newName?.trim() && newJobTitle?.trim()) {78 AxiosInstance.post("", {79 id: uuidv4(),80 name: newName.trim(),81 jobTitle: newJobTitle.trim(),82 }).then(response => {83 setPersons([...persons, response.data])84 setNewName("")85 setNewJobTitle("")86 })87 }88 }8990 return (91 <div className="App">92 {loading ? (93 <div className="spinner">94 <Spinner />95 </div>96 ) : (97 <Card>98 <table className="bp3-html-table .modifier">99 <thead>100 <tr>101 <th>Name</th>102 <th>Job Title</th>103 <th>Actions</th>104 </tr>105 </thead>106 <tbody>107 {persons.map(person => {108 return (109 <tr key={person.id}>110 <td>111 <EditableText112 value={person.name}113 onChange={value =>114 onChangeHandler(person.id, "name", value)115 }116 />117 </td>118 <td>119 <EditableText120 value={person.jobTitle}121 onChange={value =>122 onChangeHandler(person.id, "jobTitle", value)123 }124 />125 </td>126 <td>127 <Button128 intent="primary"129 onClick={() => updateData(person.id)}130 >131 Update132 </Button>133 134 <Button135 intent="danger"136 onClick={() => deleteData(person.id)}137 >138 Delete139 </Button>140 </td>141 </tr>142 )143 })}144 </tbody>145 <tfoot>146 <tr>147 <td>148 <InputGroup149 placeholder="Add name here..."150 value={newName}151 onChange={e => setNewName(e.target.value)}152 />153 </td>154 <td>155 <InputGroup156 placeholder="Add job title here..."157 value={newJobTitle}158 onChange={e => setNewJobTitle(e.target.value)}159 />160 </td>161 <td>162 <Button intent="success" onClick={() => addPerson()}>163 Add Person164 </Button>165 </td>166 </tr>167 </tfoot>168 </table>169 </Card>170 )}171 </div>172 )173}174175export default App
Rather than having the API url hardcoded in the config.js,
you can store it in a .env file so that if there are different API endpoints for different environments,
we can configure them easily. You can read more about it here.
Advantages of using axios
You might be wondering why use Axios when we have native API like fetch.
Following are the advantages of using Axios:
- We can create an instance of Axios with pre-configurations.
- No need to convert the request body to string by calling
JSON.stringifyand response to JSON by callingawait response.json(). Axios handles this for us. - Error handling needs to be done only in the catch block. If you have used fetch earlier, then you might know that you will have to handle errors in 2 different places as shown below, which can be a pain:
1fetch("https://jsonplaceholder.typicode.com/404")2 .then(response => {3 if (response.ok) {4 return response.json()5 } else {6 // Handle error 17 }8 })9 .then(data => {10 console.log(data)11 })12 .catch(error => {13 //Handle error 214 })
Source code
You can view the complete source code here.
If you have liked article, do follow me on twitter to get more real time updates!